Clawfoot Bathtub Plumbing
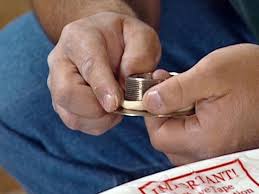
Turn off water main, then cut plumbing back to general area of new holes. Remove excess pipe sections. To re-route the supply lines, first clean all of the fittings with a wire pipe brush (Image 1). Add flux to the ends and assemble the section of pipe that turns upward toward the tub. Sweat the fitting for the end of the vertical supply line (Image 2), then insert into the elbow added to the end of the existing run (Image 3). Wedge a piece of pipe underneath the new one to hold steady, then sweat the remaining joints. Set the drain line to its new location by applying PVC pipe cleaner, followed by glue to the outside of the pipe and the inside of the reducer fitting (Image 4). Add an elbow, then build the "P" trap. Add the last piece -- the vertical pipe that will connect at the hole and screw onto the extension tube from the bathtub drain. Position the new tub near the new location, and add the new drain to tub. Add plumbers putty around the strainer and tighten down flush with tub surface.

Connect the overflow (Image 1), tighten the coupling nut at the drain, then tighten the retainer nut at the overflow hole. Install the stopper assembly on the tub, then assemble the lower drain extension. Place the drain extension into the hole in the floor, move tub into position and align over the extension drain (Image 2). Tighten the nut to hold in place. Install the "T" bracket containing the pipe holders for the exposed supply lines. Wrap the ends of the pipes with plumbers tape, place the flanges over the holes in the tile, then feed the pipes one at a time through the holder, the flanges and into the plumbing under the floor.
Arctic Cat Oil Change Instructions Adjust set screws on the pipe holders and flanges to hold the new plumbing in place.
Weight Loss Programs Bayonne Nj Install faucet assembly and tighten decorative nuts.
Led Bathroom Mirror Light With Motion Sensor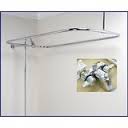
Add hand shower to complete. Ships from and sold by Plumbmagic. Vintage Clawfoot Tub Drain and Double Offset Bath Supplies Claw Foot Add A Shower with 60" D Rod and Faucet with Ceramic Cartridges and Bell Shower Head Heavy Duty Roller Shower Curtain Rings, Clipperton RollerRings, Set of 12, Roller Shower Curtain… 5.0 out of 5 stars #215,610 in Home and Kitchen (See Top 100 in Home and Kitchen) #62 in Home & Kitchen > Bath > Bathroom Accessories > Bathtub Accessories > Drain StoppersOnly problem was ten foot ceilings, upright tubing too short, but, we fixed that Worked perfectly, plumbers installed with no modifications. Plumber in stalled looks very niceClawfoot tub plumbing is not much different than installing a regular type of tub. Many people like the look of a clawfoot tub in their bathroom. This type of fixture adds some timelessness and luxury to your bathroom. They are deeper than normal tubs, and sit off the floor on elegant looking clawfoot legs.

Outfitted with ornate fixtures and hardware, this type of tub transforms your ordinary bathroom into a luxurious getaway. Unlike a normal tub, there is no framework around the tub to hide the pipes. All of the plumbing is going to be exposed to view. Making sure that the plumbing is done right will help the installation to look much better. If you are installing a clawfoot tub, plumbing it in is made easier when you know a few tips to follow. The best place to install the plumbing pipes for the clawfoot tub is in the wall nearest where the fixtures will be located. It will not only give you be the best option for installation, but also ease of access to the pipes if there is a leak. For the fixtures to align correctly, you need to take very accurate measurements of the height of the tub and where the fixtures will be located. These need to be transferred to the wall accurately also. The best way to align the drain under the clawfoot tub is to position the tub and mark the location on the floor.

Doing so will help you also see where the best position is for the supply lines and fixtures. To keep leaks from happening in the drain of the tub, use some plumber's putty under the rim of the drain. Screw the bottom of the drain assembly underneath the tub, on site, until it sits flush with the tub itself. As you run the lines from the wall to the fixtures on the tub, it is important to make sure they are straight. There should not be any elbows in the this section if it can be avoided. If you want to hide the supply lines from view, bring them out low and then up towards the fixtures. Visually the clawfoot tub will appear uncluttered with plumping from certain angles. Another great option for clawfoot tub plumbing is to use flexible braided copper pipe to make the connections to the faucet assembly. By using this type of piping you have better control over how to run them to the tub fixtures. They are easier to work with and repair in the event of a leak. Use Teflon tape on all threaded connections from the water supply to the faucet assembly.

Q. "Are all finishes in stock?" A.We recommend (and stock) chrome finishes, as chrome is the most durable. However, if your bathroom design needs a brass or nickel finish, we are confident that those finishes also will stand up to years of use, if maintained correctly. Like many plumbing supply houses and showrooms, we do not stock all items in all finishes, so if timing is critical, please contact us before ordering. Q. "With the old fashion style 1 3/8" o.d. bath tub drains, how do I adapt to my standard 1 1/2" threaded p-trap?" A. We offer a 1 1/2" x 1 3/8" chrome slip joint nut along with a D style o-ring that will fit onto the 1 3/8" o.d. tubing. Simply order the slip joint nut and d-ring above which includes both the special reducing nut and the special o-ring. Q. "Why are some of these spouts and hoses not to code in some areas?" A. If a spout terminates below the top of a tub (or a showerhead is able to reach below the top of the tub) then there is a chance (however small) that should the tub be filled to the top and the water valve is on (still running), the legally potable (drinking) water then is touching non-potable water.

When that happens there is an extremely small chance (but it is possible and therefore not code in some areas) that the potable water can become contaminated. If this is a concern or applicable, then please order only code style faucets. Most portable showerheads will be able to be placed below the top of the tub and therefore most portable hoses (no matter what brand) are not to code as well. We do offer an in-line 1/2" vacuum breaker for shower hose connections above in Chrome, Polished Brass, Oil Rubbed Bronze, Satin Nickel and White. Some codes will allow for portable showerheads (but not all). Again, some areas are very strict regarding hoses that could be laid in water, and even with a vacuum breaker some codes won't allow hoses at all. If your area has strict codes, then we do not recommend purchasing any shower hoses. We cannot be responsible, nor can we know what your area will or will not allow as far as code is concerned. Showerheads should not be laid down below the flood rim (not placed inside the tub) of a tub at any time.

Q. "What is the supercoat finish?" A. Supercoat refers to a 2-part epoxy finish that is applied electrostatically and then baked onto the brass. Unlike former days when polished brass required extensive maintenance to avoid tarnishing or dulling of the finish, supercoat brass items need fairly little maintenance to retain their beautiful shine. Simply wipe your supercoat polished brass fixtures gently with a soft cloth after each use. Avoid the use of plumber's putty, detergents, or abrasive cleaners as these may cause deterioration of the coating. Q. "Is there any special care for increasing the longevity of my shower hose?"After each use, it is very important that all of the kinks be removed from the hose before setting the handset on the bracket. Kinks left in the hose or any unusual twisting or pulling will eventually cause the hose to crack, unravel and begin to leak. Q. "If my washers fail, will the manufacturer replace them?"The replacement of washers is considered to be normal wear and tear and must be done regularly to protect the seat.