Cleaning Kohler Shower Head
Events at the Kohler Design Center CAD files & Cutout Templates For best results, keep the following in mind when caring for your KOHLER® product: Always test your cleaning solution on an inconspicuous area before applying to the entire surface. Wipe surfaces clean and rinse completely with water immediately after applying cleaner. Rinse and dry any overspray that lands on nearby surfaces. Do not allow cleaner to soak. Use a soft, dampened sponge or cloth. Never use an abrasive material such as a brush or scouring pad to clean surfaces. Click here for warranty information, or call 1-800-4KOHLER (1-800-456-4537). * Success with cleaners and procedures is dependent upon such factors as the hardness and temperature of the water, using exact measurements of ingredients, changes in cleaning formulas and the condition of the product being cleaned. Since there are variations within these factors, Kohler cannot guarantee the effectiveness of the formulas.
Enameled Cast Iron Kitchen Sinks Vitreous China & Fireclay Kitchen Sinks Stainless Steel Kitchen Sinks
Shower Curtain Rod For Slanted Wall Undertone® Preserve™ Stainless Steel
Homes For Sale In Lakes Of Rolesville Nc Cast Iron Bathroom Sinks
Bengal Cat Adoption Nc Vitreous China Bathroom Sinks Stainless Steel Bathroom Sinks Chrome & Vibrant® PVD Colors/Finishes Vitreous China Faucets and Finishes Cast Iron Baths & Whirlpools Acrylic Baths & Whirlpools Lithocast® Baths and Whirlpools Cast Iron Shower Bases Toilets, Bidets & Urinals Vitreous China Toilets & Bidets Material and Color Palette Discover our vibrant hues and versatile materials.
KOHLER Enameled Cast Iron Explore this unique material’s character and craftsmanship.For many people, basking in a hot shower is one of the most pleasurable events of the day. It's especially nice on an icy day when the shower is steaming hot, or on a stressful day when the water pounds on your shoulders like a rough massage, or a dirty or depressed day when you soap all up and the shower washes you all out, both inside and out. Hence, there is nothing so frustrating as a showerhead that doesn't work right - one that's partly blocked, is rusted out, or is broken or using too much water. This article will show you how to turn around those situations: How to clean the shower head or completely replace it. How to Clean a ShowerheadShowerheads get clogged when particles in the water pipe escape the house water filter and are caught by the shower head screen. If the particle is dirt, water pouring through the shower head will eventually dissolve it, but if the particle is rock it won't.

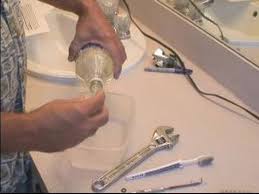
Blocks are also caused by accumulated scale and other deposits. All shower heads benefit from periodic cleaning and cleaning is easy to do. If your shower head really needs cleaning and is the kind that screws off, this is what you do: Shower Head Cleaning Materials Use this tape to waterproof the threads of any plumbing joint, without making a permanent seal. Gather the materials you'll need: Crescent wrench, soft cloth, large bowl, plumber's tape (or putty) and scissors, old toothbrush, toothpicks, baking soda, vinegar. Unscrew the showerhead from its shower arm - Use the wrench, placing the soft cloth between it and the shower nut, so you don't scratch the chrome. Turn the shower head left (counterclockwise) until it comes off. Dislodge any rocks blocking the holes - Turn the shower head upside down in the sink and blast water through it, washing any rocks back out the way they came. Use a toothpick to poke through holes that are still blocked. Clean any encrustations off the shower head - Use the toothbrush and baking soda to scrub the bottom side of the shower head where the water comes out.

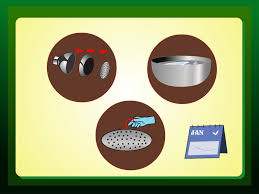
Turn it upside down again and run water through to rinse out the baking soda. Dissolve scale from the inside and any on the outside that hasn't already come off - Fill the large bowl with enough water to cover the shower head, then add about 1/4 cup of vinegar. Stir and let sit for at least an hour. Clean and shine it up. Dump the contents of the bowl. Run water through the shower head. Use the soft cloth to dry and buff it up. Screw the shower head back on - Wrap a few layers of plumber's tape around the shower arm threads (or smear on the putty lightly). Screw the shower head back on, turning to the right (clockwise). Tighten with the wrench. Turn the water on to make sure it doesn't leak. Pour yourself a celebratory glass of wine. Cleaning A Fixed Showerhead Use a soft cloth under the crescent wrench to keep your chrome from being scratched. If your shower head does not screw off, the best you can do is to clean off any scale or other deposits by soaking.
This is easier than the procedure above, but if the shower head has somehow become clogged, you'll likely have to replace it (see below). To soak off the deposits: Gather the materials you need: Plastic baggie that will fit over the shower head, thick rubber band, white vinegar, soft cloth. Soak the shower head in vinegar - Fill the plastic baggie with vinegar. Carefully insert it over the shower head and secure with the rubber band. Leave it on to soak for 6-8 hours. Rinse off the vinegar - Take the baggie off. Dump the vinegar and fill the baggie with water. Pour it over the showerhead. Run the shower for a minute to clear out the inside. Dry and polish it up - Use the soft cloth to clean off anything remaining and shine up the chrome. How To Choose & Replace Your Shower HeadThe actual shower head replacement process is easy. It's the choosing that requires greater attention. What are you looking for? Considering all the benefits a good shower head can bring and the variations in cost, it's worth it to take the time to weigh them well:

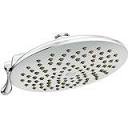
Some shower heads can help you save money on monthly water bills, which could counteract a higher, upfront purchase price. A few have built-in chlorine filters, which can improve your health & increase vitality. Different heads have different intensities of flow. Some are easier to clean than others. There are a ton of different prices to choose between. Breathing chlorine in the shower can affect your health more than you think. This showerhead has nozzles that resist hardwater buildup and a finish that resists corrosion and tarnishing, making it easier to clean. The first step in choosing is to identify factors that are important to you. Here is a little exercise to help with that: Imagine the best shower/s you've ever taken. What was so great about it? Write the answer/s down. Look at your health and compare it with the effects of chlorine on the body. Is there a match? How long do you like to shower and how high are your water bills?

Should you be using less water? Is a variability of flow important to you? Do you sometimes like a hard shower and other times a soft one? Consider any other factors that are important to you, including price and budget. Go back through everything you've written. What are the three or four items that stand out? These will be your criteria for selecting a new shower head. Assistants Can Help You Choose Which of these projects have you done yourself? Cleaned up the shower head. Replaced the shower arm. Installed a new shower head. Two or more of the above. None of the above. Now you're ready to shop. There are plenty of places to buy shower heads, both online and offline. Some quality brands to look for are Niagara, Kohler, AKDY, and Speakman. If you would like someone to guide you to the right one for you, take your criteria to a hardware store where the assistants know what they're doing: Orchard, Home Depot, Ace Hardware are a few on the USA's west coast.

Once you've bought your new shower head, remove it from its packaging and get ready to install it: Gather your materials: New shower head, crescent wrench, soft cloth, plumber's tape. Take the old shower head off - Use the wrench to unscrew the old shower head, turning it to the left (counterclockwise). Put the new shower head on - Wrap a few layers of plumbing tape around the shower arm threads. Make sure the washer and all components are inside the new shower head. Screw it onto the shower arm, turning to the right (clockwise). Use the crescent wrench, with the soft cloth protecting the shower head, to tighten it on. Test and shine everything up - Step away and turn the water on to check for leaks. If everything's cool, use the soft cloth to polish up the shower head and shower arm.Now for the reward of a great shower - finally the perfect one with many awesome, good feeling showers to come. Congratulations . . . and where is that wine?! Replace Your Hand Held Shower Head