Delta Kitchen Spray Hose Replacement

Edit ArticleHow to Change the Faucet Hose in a Kitchen Sink Three Methods:Remove the Old HoseConnect the New Supply HoseConnect the Sprayer HoseCommunity Q&A A leaking supply or sprayer hose under the kitchen sink can be costly. Fortunately, it is an easy task to replace the hose with a new one. You will have water supply hoses for the hot and cold faucets and a sprayer hose if you have a sprayer handle. You may want to replace all of the hoses at the same time to prevent another leak. Shut off the water valve under the sink by the hose. Turn on the faucets to allow any water in the hoses to be released. Place a bucket under the hose area to catch any drips when you remove the hoses. Use a pair of pliers to loosen the connection on the hoses from the faucet. Loosen the connection to the cut-off valves with the pliers. Dry the thread on the cut-off valves with a clean cloth. Wrap plumber’s tape around the cut-off valve. Connect the new supply hose to the faucet by hand.
Use the pliers to make a quarter turn to tighten. Connect the other end of the hose to the cut-off valves and tighten a quarter turn with the pliers. Turn the water valves back on and check for leaks. Shut off the water valves under the sink. Disconnect the sprayer hose from the faucet by using pliers. Disconnect the sprayer hose base from the sink by turning the connection nut. Lift the sprayer hose base and head out of the sink from above. Twist the sprayer head off. Attach the sprayer head onto the new hose. Slide the sprayer base over the hose and put the hose in the hole in the sink. Push the sprayer base through the hole. Connect the sprayer base to the sink with the connection nut. Connect the sprayer hose to the faucet and tighten by hand. Measure the length of the supply hoses to make sure you get the right size.Turn on the water. If you find any leaks, tighten connections on the water supply line.If you find any leaks, tighten connections on the water supply line.

Attach supply lines to the faucet and then to the shut-off valves. Hot water connects on the left, cold on the right.
House For Sale Butuan City PhilippinesAttach supply lines to the faucet and then to the shut-off valves.
English Bulldog Puppies For Sale In New MexicoHot water connects on the left, cold on the right.
Cats For Sale In Albuquerque Nm Underneath the sink, thread on the flange and nut with a basin or socket wrench.Underneath the sink, thread on the flange and nut with a basin or socket wrench. Seal the new faucet: if using a gasket, put the gasket on the lip of the plate and thread the hoses through. If using plumber’s putty, apply around the base of the faucet and set it in place.

Seal the new faucet: if using a gasket, put the gasket on the lip of the plate and thread the hoses through. If using plumber’s putty, apply around the base of the faucet and set it in place. Measure the distance, center to center, of the outside holes of your sink to make sure the new faucet will fit. Read any instructions that come with your new faucet.Measure the distance, center to center, of the outside holes of your sink to make sure the new faucet will fit. Read any instructions that come with your new faucet. Pull the old faucet out and clean the surface of the sink.Pull the old faucet out and clean the surface of the sink. Disconnect the line that connects the hose to the faucet, if your sink has one.Disconnect the line that connects the hose to the faucet, if your sink has one. Use a basin wrench or a socket wrench to remove the nut holding the faucet tailpiece assembly in place.Use a basin wrench or a socket wrench to remove the nut holding the faucet tailpiece assembly in place.

Use an adjustable wrench and a pair of channel locking pliers to disconnect both of water lines from the faucet. If supply lines are old and gaskets worn out, consider replacing them with flexible supply lines.Use an adjustable wrench and a pair of channel locking pliers to disconnect both of water lines from the faucet. If supply lines are old and gaskets worn out, consider replacing them with flexible supply lines. Turn off the hot and cold water shut-off valves. These are usually located in the cabinet directly under the sink.Turn off the hot and cold water shut-off valves. These are usually located in the cabinet directly under the sink. A new faucet is a great way to give a fresh look to a kitchen or bathroom. Your local independent home improvement retailer has a variety of styles to choose from, from the simple to the extravagant, and we can often special order, so you get just what you want. Plus, installing a new faucet is an easy project for a beginning do-it-yourselfer.
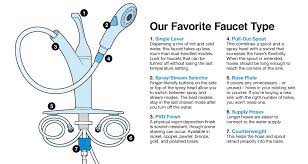
In this video, we’ll show you how to install a basic, pull-out faucet in your kitchen sink. But before we get started, here are a few things to keep in mind. Even though we’ll be installing a faucet in the kitchen, the same principles apply to installing any faucet. Also, you should know that different faucets may have different configurations. For example, bathroom faucets may have a pop-up drain attached. Some faucets have a single handle, or a mixer, and others have two handles. Whatever the configuration of your faucet, you’ll always be hooking up the hot and cold water lines as well as a bolt that holds the faucet to the sink. You’re going to need a few basic plumbing tools for this project, so be sure to check out our Tools and Materials checklist for a complete list of everything you need. Let’s get started by removing the old faucet. Like with most plumbing projects, we’ll start by turning off the hot and cold water shut-off valves, which are usually located in the cabinet directly under the sink.

When you’re finished, open up the faucet to relieve the pressure. Next, use an adjustable wrench and a pair of channel locking pliers to disconnect both of water lines from the faucet. If you suspect the supply lines are old and gaskets worn out, you might consider replacing them with flexible supply lines like the ones I’m holding here. Underneath the sink, use a basin wrench or a socket wrench to remove the nut holding the faucet tailpiece assembly in place. If your existing faucet has a spray hose, you’ll also want to disconnect the line that connects the hose to the faucet. Sometimes it’s easier to pull the faucet out and disconnect it from above. When you’re finished pull the faucet out and clean the area on the sink where the old faucet was located. Now you’re ready to install the new faucet. Most sinks today have three holes to accommodate the faucet. Measure the distance, center to center, of the outside holes of your sink to make sure the new faucet will fit.

And always be sure to read the manufacturer’s instructions. When you set the new faucet in place, you’ll need something to seal the base. Some faucets, like ours, have a gasket that goes between the sink and the faucet. If yours does not have one, apply a bead of plumber’s putty along the groove around the plate. This will keep water from dripping down into the sink cabinet. If you have a gasket, put it on the lip of the plate, and with the plate in place, go ahead and thread the hoses through the plate and place the faucet on the sink. Underneath the sink, thread on the flange and the nut that will hold the faucet to the sink using a basin wrench or a socket wrench. If you’re installing a pull out faucet, you’ll also need to add the weight that will retract the pull-out spray back into the faucet and connect the pull out spray water lines. Next, attach the supply lines to the faucet and then to the shut-off valves below. Remember, hot water goes on the left and cold water connects on the right.