Delta Shower Head Seal

Select items discounted for a limited time only. Delta Faucet RP34355RB Universal Showering Components, Touch-Clean 3-Setting Showerhead, Venetian BronzeDetailsDelta Faucet U4993-RB Universal Showering Components, 6-Inch Shower Arm and Flange, Venetian Bronze FREE Shipping on orders over $49. DetailsDelta Faucet Foundations BT14096-OB Monitor 14 Series Valve Trim Only, Oil Bronze FREE Shipping. 5.7 x 5.7 x 5.7 inches #44,925 in Home Improvements (See top 100) #653 in Home Improvement > Kitchen & Bath Fixtures > Bathroom Fixtures > Bathtub Faucets & Showerheads #3,124 in Home Improvement > Contractor Supply See all 84 customer reviews early adopter in ATL See all 84 customer reviews (newest first) Just like the original.Exactly what i expected This was a replacement for the same shower head I had. It started to leak from the back of the flange. Wish we had changed it before now. Like it a lot better than the original which was 13 years old.

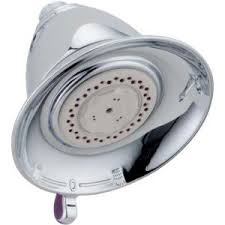
Just like the one we had. Glad I found this item to replace my old leaky showerhead I recently stayed in the Quality Hill Resort in Pine Top, Arizona and experienced this shower head in our condo. Delta 75565RB 5-Spray/Massage Victorian Shower Head, Venetian Bronze Aqua Elegante 6 Function Luxury Shower Head - Best High Pressure, Wall Mount, Adjustable Showerhead - Oil-Rubbed Bronze Delta Faucet U4993-RB Universal Showering Components, 6-Inch Shower Arm and Flange, Venetian Bronze Delta Faucet RP41589RB Universal Showering Components, Touch-Clean(R) Showerhead, Venetian Bronze See and discover other items: delta shower headAra 1-Handle Tub and Shower Faucet Trim Kit in Stainless with Less Showerhead (Valve Not Included) Victorian 3-Spray 5-1/2 in. Touch-Clean Shower Head in Chrome Easily wipe away mineral build up with Touch-Clean spray holes The Delta Victorian 3-Spray 5-1/2 in. Touch-Clean Showerhead in Chrome helps create a charming and classic appearance in your bath or powder room.

This showerhead lets you choose from a massage, soft drench or full spray for a relaxing and personalized shower. The bright chrome finish is resistant to tarnishing and corrosion helping ensure a long-lasting and beautiful appearance. 2.5 GPM flow rate helps provide a steady water flow 3-spray sprayer features a soft drench, massaging and full body spray for a personalized shower experience Tarnish- and corrosion resistant chrome finish Touch-Clean technology helps make for easy removal of build-up How To Install a New Showerhead This question is from Victorian 3-Spray 5-1/2 in. Touch-Clean Shower Head in Venetian Bronze2 How do I fix this shower head if when turned on it sprays (drips) water from the top of the unit? This question is from 3-Setting 3-Spray Touch-Clean Showerhead in Champagne Bronze1 Our shower head is leaking around the bell. It is probably only 2-3 years old and wasn't cheap. Is there anything we can do to fix it? We've tried removing it and reinstalling and it didn't help...seems like a design flaw to us.

We have a home improvement business so we encounter issues like this with older, inexpensive models which was why we went with the Delta.Purchase Delta faucets, tub/shower sets, shower heads, and more More Quality Kitchen Faucets More Quality Lav Faucets Tub Spouts & Water Supplies Parts for Kitchen& Bar Faucets Parts for Bathroom Faucets Parts for Tub & Shower Fixtures All Parts - Pg 1 All Parts - Pg 2 Identify Your Delta PartFind your fixture, then click to find your repair parts
Toilet Blocks For Sale Nsw Find Parts for Delta Kitchen & Bar/Prep Faucets
Blue Paisley Curtains And Drapes Find Parts for Delta Bathroom Faucets
Digital Slr Camera D3300 Price Find Parts for Delta Tub & Shower Fixtures

More Faucet Repair Parts Q. "How do I find my Delta faucet part?" A. Use the images above to find your faucet or fixture. Once you find it, click on the image to find replacement part for it. If you still have trouble finding the correct part, please feel free contact us and our customer service team will gladly assist you.Edit ArticleHow to Fix a Leaking Shower Head Four Methods:Unclogging your Shower Head HolesReplacing a Worn Rubber WasherCleaning or Replacing a Malfunctioning Diverter ValveReplacing a Malfunctioning Cartridge ValveCommunity Q&A A leaking shower head can be costly and annoying. If yours happens to be leaking, there could be one of many reasons why. But this doesn’t mean you have to call for a plumber. The solution might be easier than you think. Before shelling out big bucks for what might be a simple fix, learn how to fix a leaking shower head with these helpful tips. Turn off the water supply to your shower head. A leaking shower head can be caused by clogged holes, resulting from lime and other mineral deposits that build up in the holes over time.
If you’re unsure what could be causing your leaking shower head, start here. It’s a simple, cheap fix that doesn’t require you to take apart your entire shower fixture. Shut off your water supply before you get started. You can do this in one of two ways: locate and turn off the shutoff valve to the bathroom or turn off the main water line. It will probably be easier on your household to turn off the water supply directly to the bathroom instead of cutting off the supply to the entire house. The shutoff valve to the bathroom can usually be found somewhere near the shower or in the basement. Remove the shower head faceplate or the entire shower head. Because you’ll have to soak and scrub the parts of the shower head that have the lime and mineral deposit buildup, you’ll have to remove it from the rest the shower fixture. Unscrew just the faceplate, if you can. If you can’t, then remove the entire shower head from the fixture. How you go about doing this depends on the make and model of your shower head.

In a typical disassembly, look for screws surrounding the shower head faceplate or the shower head itself to undo. Once the screws are undone, twist counterclockwise or pull the faceplate or shower head to remove. Immerse the faceplate or shower head in white vinegar for 8 hours. Purchase or obtain a container large enough to hold the faceplate or shower head. If you have more than one bathroom that you and/or your family can utilize, you could otherwise use the bathroom sink, if it’s large enough. Fill your container or sink with white vinegar. The amount of vinegar you use should be enough to fully cover the faceplate or shower head. Set a timer for 8 hours, or calculate 8 hours from the time you set the faceplate or shower head in the vinegar. While it’s soaking, the vinegar will work to dissolve the buildup and deposits. Manually remove leftover deposits. Check to see if the leaking shower head is fixed. Turn off the water supply to your shower.

A leaking shower head can also be caused by a worn out rubber washer. Over time the washer, or “O ring,” starts to crack. Water seeps through those cracks, resulting in a leaking shower head. Replacing this washer will solve the problem. Shut off the water supply to your bathroom, which you can find either near your shower or in your basement, if you have one. If your shower faucet is a compression faucet, meaning it has two faucet handles to separately control the cold and hot water, you’ll need to feel the water leaking from your shower head to determine if the leak is coming from the cold-water valve or the hot-water valve.[1] This will let you know which faucet you’ll have to work on. Determine which rubber washer needs to be replaced. Replace the rubber washer in your shower head. To replace the rubber washer in your shower head, start off by taking the shower head apart. While different brands of shower heads are built differently, there should be a collar nut attached to the shower arm.
The collar nut looks like a regular metal nut, but it extends lengthwise. It has a neck, or rather a collar, that’s typically about 1.5 times it’s diameter. Using a wrench, loosen that collar nut to separate the shower head from the shower arm. Once removed, look beneath the shower head’s swivel ball to find the rubber washer. The swivel ball is a metal fixture that attaches directly to the shower head, and is what allows the shower head to move around. Look for a metal fixture that somewhat resembles a large nut with a metal ball on the end. If you can rotate it like you would a shower head, then you’ve found the swivel ball. When you locate the rubber washer, pull it off, and then replace it with a new rubber washer of similar size and style. To ensure that the new washer works properly, it should look practically identical to the old washer. Replace the rubber washer in your faucet. Disassemble the appropriate faucet handle by unscrewing it. (The temperature of the leaking water should let you know whether you should be working on the hot or cold faucet handle.)

Depending on the style of your faucet this screw may be in plain sight or hidden behind a cover cap. If your faucet is an older model, look for the screw to be exposed on either the front or side of your faucet. If it’s newer, use a tiny pocket knife to lift the cover cap to expose the screw. Once the screw is removed, pull the handle hard to pull it off of the faucet body. You may need a faucet puller to do this, if you’re unable to do it by hand. Once the handle is off, remove the trim and sleeve that covers the faucet stem. Then use a deep socket to unscrew the faucet stem. The faucet stem is held down by a hex nut, so you’ll need to use the deep socket to unscrew the hex nut. The hex nut is simply a nut with six sides. Now you can replace the rubber washer. If you’ve purchased the faucet washer kit, you can also replace the flat washer at the end of the stem and the seals. Reassemble the shower parts and check to see if the problem’s fixed. If you changed the rubber washer in your shower head, connect the shower head back onto the shower arm, and turn back on your water supply to confirm whether the leak has been fixed or not.

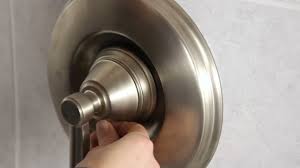
If you changed the rubber washer in the shower faucet, then begin putting your shower faucet back together starting with the faucet stem. Use a little bit of plumber’s grease on the threads where the stem will go, then screw the stem back on. Put the handle back in place, but don’t screw it on until you’ve confirmed the leaking shower head is fixed, which you can test by cutting your water supply back on. Turn off the water supply to your bathroom. Unscrew and remove the faucet handle to expose the diverter valve. Locate the screw to your faucet handle, which should either already be exposed or which may be hidden under a cap. You can remove the cap using a tiny pocket knife. Take out the diverter valve. Clean the diverter valve or replace it. Reassemble the faucet handle and determine if the leaking shower head is fixed. Reverse the previous steps to reassemble the faucet handle. Before you screw it back on, turn on the water supply to see if the leaking shower head is now fixed.

In a one-handle shower faucet, a malfunctioning cartridge valve could be the reason for your leaking shower head. If the less-intrusive solutions to fixing your leak problem haven’t worked, then you may need to replace your faucet’s cartridge valve.[3] Before you begin, shut off the water supply to your shower, either by shutting off the valve supplying water to your bathroom directly or by turning off the main supply of water throughout your house. Remove the faucet handle and expose the cartridge stem. Locate and loosen the faucet handle screw, which may be exposed or located beneath a cap on the handle. Once the screw is removed, you can pull off the handle. Pulling off the handle may be difficult if the handle is pretty set. And if it is, try warming the handle with a hair dryer if you have one. If you don’t have a hair dryer at your disposal, or if the hair dryer simply isn’t working, head to your local hardware store to purchase a handle puller. Once the handle is off, remove the stop tube, unscrew the cartridge retaining clip using a small screwdriver or awl, and then remove the handle washer.

You should then be able to see the cartridge stem. Remove and replace the cartridge. The method you’ll use to remove the cartridge will differ by manufacturer. There may even be a cartridge removal cap with the new cartridge you’ve purchased. In a typical removal, you’ll want to first unscrew the hex nut that covers the cartridge stem. Untwist the cartridge stem and then remove it with pliers. If the pliers aren’t working, you’ll need to use a cartridge puller. Fit the puller over the cartridge stem and twist to unscrew it. Once it’s loose, use pliers to remove it. Insert the new cartridge in its place, and screw it in. The new cartridge should be identical to the old one. Reassemble the faucet handle and check to see if the leaking shower head is fixed. Before you begin taking things apart, line the floor of your shower or tub and cover the drain. This will protect your shower or tub from damage, and also prevent you from losing necessary shower pieces or materials down your drain.