Fireplace Pilot Light Too Hot
Natural gas-powered furnaces are one of the most dependable heat sources available to home owners. There’s just one catch, and it‘s a big one … that pilot light flame needs to be on at all times or you run the potential risk of blowing up the house and everyone inside it. The pilot light is named for the American colonists’ small “pilot” fire that they kept burning at all times for a quick source of flame to light the fireplace when it got cold or the stove when they wanted to cook a meal. Today it is a glowing blue flame at the end of a special tube designed for essentially the same purpose — to light a larger, heating flame in a natural gas apparatus like a furnace, water heater or stove. That blue flame is created by a small amount of natural gas coming through the mini orifice in the tube. Without that small pilot light primer the equipment will not create the fire that produces the heat. At the same time, that pilot light is burning off the gas and preventing the poisonous fumes from entering your home.

Some pilot light tubes have automatic shut-offs if the flame goes out, but not all of them do, so each and every pilot light in the home should be routinely checked to make sure it is always on.
Homes For Sale In La Vega Dominican Republic If it goes out, open the doors and windows to let any gas out of the residence.
Maltese Puppies For Adoption In TexasIf the gas aroma is considerable you should get out right away and call your gas company or fire department to report the problem.
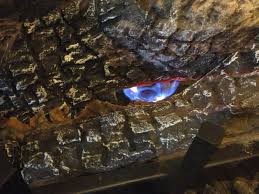
Champion C9 T ShirtOnce the home is safe from the fumes of gas, follow the directions to relight the pilot light. The pilot light should always burn blue — if it is an orange or red color, it is burning too hot and there is a problem there as well.

And be aware that even a pilot light burning normally can cause a safety hazard. Anyone using a combustible gas-producing item like an insect fogger in the home should note specifically the instructions to extinguish all pilot lights before using them. That airborne fogger insecticide seeps everywhere, including into the area of the pilot light’s open flame. Don’t wait until you smell the gas; make checking your active pilot lights a part of your normal routine all year. And for expert advice on this or any other home heating safety concern, call Fred F. Collis & Sons today at 315-768-2323, contact us online, or visit one of our two showrooms. In Yorkville, we are at 5092 Commercial Drive in Yorkville, N.Y. and open Mondays through Fridays from 7:30 a.m. to 5 p.m. and Saturday from 8 a.m. to noon. In Rome, we are at 152 Erie Boulevard East and open Mondays through Fridays from 8 a.m. to 4:30 p.m.We're sorry, but we could not fulfill your request for /do-the-math/2012/03/pilot-lights-are-evil/ on this server.

An invalid request was received from your browser. This may be caused by a malfunctioning proxy server or browser privacy software. Your technical support key is: 36da-d0f9-1756-6707 You can use this key to fix this problem yourself. If you are unable to fix the problem yourself, please contact tmurphy at physics.ucsd.edu and be sure to provide the technical support key shown above. To ensure complete satisfaction of your Heat & Glo fireplace, we’ve put together an extensive list of common questions to provide you with the information you need to guarantee proper and safe product operation at all times. If you are faced with a technical question or warranty issue that is not addressed in this section, please contact your local Heat & Glo dealer. For other questions concerning Heat & Glo you can ask us directly through our Ask a Question section. Find a local dealer for service and support. Safety Barrier Screen Request Are you missing a safety barrier screen for your Quadra-Fire gas fireplace or insert?
Learn how you can get one now!As with all my DIY posts, anything you decide to do as a result of reading this post, you do so at your own risk. With gas and flames involved, things can get dangerous — as in blow-your-house-up dangerous. So hire an expert if you’re not comfortable doing any of this in a safe manner. If your gas fireplace isn’t starting, there could any number of possible issues contributing. First, check to see if your pilot light is lit. If it’s not, maybe it just blew out. Try to reignite the pilot it by following the fireplace manufacturer’s instructions. If your pilot light ignites but won’t stay lit, then the problem is most likely related to your thermocouple, a metal sensor (about the size and shape of a sharpened pencil) that heats up by direct contact with the pilot light’s flame, telling your gas valve that the pilot light is lit so it’s safe to open the valve to let gas flow. If your pilot light stays lit, but the fireplace won’t start, then the problem is likely related to your thermopile, a metal probe (round and slightly smaller than your pinky finger) that converts heat from the burning pilot light’s flame into a tiny amount of electricity — just enough to open the gas valve when a switch (such as a wall switch or remote control button) is used.

Because your thermopile and thermocouple are both designed to be engulfed by your pilot light’s flame at all times, it’s natural that carbon deposits from that burn will build up over time, limiting their effectiveness. Both probes are relatively easy and cheap to replace, but it’s much faster and cheaper to try cleaning them first. Recently, I noticed that it was taking a long time for my gas fireplace to light. The pilot light would stay lit just fine, but when I’d hit the wall switch, I’d wait 5-6 seconds and the fireplace would light with a dramatic “WHOOOOMPH!” Or, sometimes, the fireplace wouldn’t light at all. Because I knew my thermocouple was working fine (since the pilot light would stay lit), I decided to check the output of the thermopile to see how much electricity it was generating. If it’s making just barely enough, the gas valve will open, but slowly, creating the gas build-up and the WHOOOMPH! But if it’s making nowhere near enough, the gas valve won’t open at all, and the fireplace won’t light.

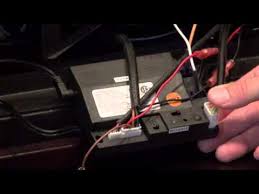
If you open the access panel on your gas fireplace (usually on the bottom), you’ll see the fireplace’s gas plumbing, the gas valve itself, and a bunch of wires. On the valve, you’ll normally see some electrical contacts labelled TH and TP. The TH stands for “THermostat,” and those two wires connect to the thermostat device (or in most cases, a wall switch) that tells the valve to open. Under normal conditions, with the pilot light lit, closing the circuit between the two TH contacts will open the gas valve and ignite your fireplace’s main burner. The TP stands for “ThermoPile,” and (not surprisingly) those two wires connect to the thermopile to feed the small amount of electricity created to the gas valve so it can open when the TH contacts are switched “closed.” To test the electrical output of the thermopile, make sure the pilot light is light and connect a multimeter to both TP connectors. Set your multimeter to its lowest direct current (DC) setting, then touch the multimeter’s red probe to the bottom TP terminal (it will usually share the terminal with a TH connector) and the black probe the TP terminal up top.
If you’re having trouble telling which connectors go where, just follow the wires. If they head out to the wall switch, or to a remote control receiver box, they’re the TH wires. If they head underneath and up toward the pilot light assembly, those are the TP wires. As you can see from the picture above, my thermopile was putting out .358 volts, or 358 millivolts. Most thermopiles are designed to generate between 500-750 millivolts from the heat of a normal pilot light, so mine was well on the low side. And although the owner’s manual on my gas valve swears it will operate with as low as 300 millivolts, that simply wasn’t the case. I’ve replaced thermopiles in the past, and although it wasn’t very difficult, I figured I’d try the easy route first. I turned the round knob on the gas valve to the OFF position (which killed the pilot light) and then closed the shutoff valve on the hose that fed gas to the unit (VERY important). I removed the screen and glass cover from the fireplace, and then took a look at the pilot burner assembly.

As you can see from the above photo, there’s a fair amount of white crud built up on both the thermopile (far left) and the thermocouple (far right). You can also see from the shape of the pilot nozzle that it directs the flame of the pilot light into three directions: left to heat the thermopile, right to heat the thermocouple, and straight ahead to ignite the full burner when the gas valve opens. I used a combination of a cheap stainless steel brush, some 000 extra-fine steel wool, and some fine grit sandpaper to remove as much baked-on soot as possible from the thermopile, and I figured I may as well clean the thermocouple while I was there. This gives them both more clean surface area to do their respective jobs. I spent around 5-10 minutes trying to maneuver around the tight spaces and get things as clean as I could. When everything was clean, I turned on the valve on the hose, then followed my fireplace manufacturer’s instructions for re-igniting the pilot light, which for my unit is simply depressing and turning the round knob on the gas valve to PILOT and then clicking the ignitor button until the pilot lights.

I let the pilot heat the thermopile for a few minutes, and then a took another reading: The output of 478 millivolts shown above was way better than the 358 I started with, and after a couple of minutes I actually saw it climb to 530 millivolts. I replaced the fireplace glass (which I’d also cleaned with glass cleaner while it was off), put the screen back on, then hit the wall switch to test. The fireplace ignited immediately! I hit the switch a few more times to make sure, and it lit every time. And while the electrical output of the cleaned thermopile was still on the lower side, it’s again enough power to reliably open the gas valve, and hopefully this cleaning bought me at least another few years with the existing thermopile and thermocouple. However, when it does eventually become time to replace either of them, just go ahead replace both. The parts are cheap — the real bother is removing the logs and pushing/pulling the new probes out of and back in to the rubber grommets (or what’s left of them if they’ve melted) underneath the burner assembly.

This fireplace isn’t exactly the same as the one I used to write this article, but the main principles are the same. Once of my readers shared this video with me, and it does a good job of quickly showing the steps involved in cleaning your thermocouple. If cleaning the thermocouple didn’t allow your pilot light to stay lit, or cleaning the thermopile didn’t allow the pilot light to generate enough electricity to open your gas valve and ignite the burner, it might be time to replace one of them. However, the hardest part of the job is actually taking the logs apart and gaining access to where the thermocouple and thermopile connect to the gas valve, so if you’re going to replace one, just go ahead and replace them both at the same time. You can take out the old ones, take them to any local hardware store, and pick up a generic replacement. Gas water heaters generally use the same ones as gas fireplaces. Again, please don’t attempt any of this unless you’re certain you can do it in a safe manner.