Hot Tub Drain Plug Leak

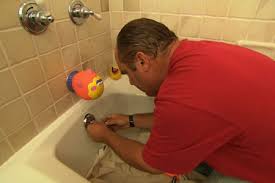
How to Fix a Leaking Jacuzzi Tub Drain How to Fix a Leaking Jacuzzi Tub Drain paper towels or tissues a helper is useful new pipes as needed new washers as needed mastic putty as needed new compression joints as needed new fixture as needed If you notice a leak in your Jacuzzi tub drain, you should act quickly to rectify the situation as it can cause damage to the surrounding floor or to the ceiling below if your Jacuzzi is located on an upper floor. Fixing a leaking Jacuzzi tub drain is much like repairing a leaking drain in a regular bath except you are dealing with electrical power so you need to be mindful and be sure that all power to the tub is disconnected before you begin your work. Once you have determined that the leak is coming from the drain and not from another source, you can begin. Other possible causes of leaks are shell cracks, pipe leaks, and leaks through the jet fittings. Step 1 – Diagnose Leak You will need to access the pipes behind the tub.

Joints can vibrate loose in new tubs, so this is good place to start. You may have leaky joints, cracked pipes or the waste fitting may be poorly seated or badly sealed. Put the stopper in the tub and fill with a small amount of water. Lay a few pieces of paper on the floor under the pipes where you suspect the water is dripping, Have your helper remove the stopper while you shine a flashlight on the drain. You should be able to confirm that it is the drain that is leaking. You will also be able to see any drips on the paper and you can look up and locate the leak. Shining a flashlight on the area that you suspect of leaking is an easy way to find it. Step 2 – Remedies Seal: You may determine that the seal that holds the drain to the tub has gone bad over time. If this is truly the case, you may be able to use mastic putty to reseal the joint and replace the fitting at the base of the bathtub as well. Replacing the pipe if broken: It is possible that a pipe has cracked and this is what is causing the leak.
It is best to replace cracked pipes although there are some compounds available to patch it. Consult with your local hardware store or Jacuzzi dealer. A leaking joint: It is more likely that the leak is coming from a leaking joint. Never use a wrench to tighten spa joints. They should be tightened by hand although you might find this difficult. If you are finding that it is difficult to tighten by hand, loosen the pump mounting bolts so you can move the components slightly. Move them into proper alignment and then tighten again. You may find this is easier. First you should try tightening the joints and see if this will fix the problem. Check all the washers and replace any which seem to be damaged or old. Test for leaks again by filling the tub and letting it drain. If you are still getting a leak, you may have to completely replace the offending joint. How to Locate the Drain Hole in a Hot TubMy hot tub drained for no apparent reason. September 23, 2006 Subscribe

My hot tub drained for no apparent reason. Written Written Written Written A) Disconnect all energy to the spa. Examine the hardware compartment. On the off chance that break is under the pump, this demonstrates a conceivable pump seal disappointment. In the event that break is identified, supplant pump or put in new seal, as suitable. B) Check every union fitting at hot tub pump and radiator.
Used Office Furniture Topeka KsUnions can even vibrate free on a fresh out of the box new spa amid shipment, and ought to be hand fixed if vital.
T-Shirt WeezerIn the event that hand fixing is troublesome, extricate pump mounting jolts, move parts into arrangement, then fix unions and re-fix pump mounting jolts.
Pitbull Puppies Sale TennesseeNever utilize a wrench to fix spa unions.

C) Next, review warmer, weight switch and encompassing parts. Supplant any imperfect parts as showed by hole. See Heater Testing D) Inspect the greater part of the valves. Repair or supplant if hole is demonstrated. Blade style valves are some of the time darted together and contain a gasket between the parts which can fall flat, especially after solidifying or with delayed poor water quality conditions.In this how-to video, This Old House plumbing and heating expert Richard Trethewey shows how to adjust a leaky tub stopper In this video, This Old House plumbing and heating expert Richard Trethewey explains how to fix a bathtub drain stopper. 1. Remove the two screws holding the trip lever plate to the tub wall. Put screws in safe place, so they don't fall down the drain. 2. Grasp the trip lever plate and carefully pull out the brass waste-and-overflow linkage. 3. If the cylindrical brass plunger isn't attached to the end of the linkage, use a flexible retriever to reach down into the overflow hole and grab the plunger.

Once you've retrieved the plunger, hook it back onto the end of the linkage rod and pinch it closed with pliers. Check to be sure the plunger can't slip off. 5. Loosen the locknut and rotate the plastic fitting to lengthen the linkage about 1/4 inch. 6. Tighten the locknut and slip the brass plunger and linkage back down the overflow hole. 7. Replace the screws in the overflow plate, and flip up the trip lever. 8. Fill the tub with a little water, shut the faucet, then check to see if the water stays in the tub. If it drains out, remove the overflow plate, lengthen the linkage a little bit more and reinstall it. 9. Lift up on the trip lever, add some water to the tub and check once again to see if the tub stopper is properly adjusted. Repeat this process as many times as necessary to obtain a watertight seal.When a pop-up drain stopper in a sink or bathtub stops working, how do you fix it? This expert guide shows how drain stoppers work and how to repair them.

Pop-ups are simple mechanical devices that use a system of links and levers to move a drain stoppers up and down to seal a sink bowl or bathtub. Bathroom sink pop-ups are raised and lowered with a lift knob or lever, usually located on or near the faucet body. The knob or lever is connected to a lift rod that is fastened to a flat, slotted bar called a “clevis.” The clevis is connected by a small spring clip to a pivot rod–and–ball assembly—a rod that runs through a rubber pivot ball and slopes slightly upward to the tailpiece of the stopper. This pushes the stopper up or lets it drop down into the drain body. Pushing the knob and the lift rod down causes the pivot rod to push the stopper up; pulling the knob causes the pivot rod to pull the stopper down. If you want to remove the assembly, you may be able to pull it right out. On a bathroom sink, it’s often necessary to remove the retaining nut and extract the pivot rod first. You may have to twist the stopper to unhook it from the pivot rod.

A bathtub pop-up is raised or lowered with a lever at the tub’s overflow plate. The lever operates a lift linkage that pulls on a spring. The spring pulls a rocker arm that raises and lowers the stopper (see the illustration). It is usually very simple to pull out the stopper and rocker arm linkage. Click here to buy pop-up drain stoppers online. Stoppers that don’t close can keep the drain or tub from filling properly and waste water. Stoppers that don’t open readily or don’t open all the way make water drain sluggishly. These kinds of stopper problems are mechanical and can be solved with simple adjustments. It’s easy to remove a tub stopper to check it for mechanical problems or blockage. 1. Simply grip the stopper body and pull it out of the drain along with the hinged rocker arm. 2. Clear the stopper and rocker arm of hair and debris. 3. Check the rubber seal for damage and, if necessary, replace it. Remove the old seal and slip on a new one if needed.

4. Reinstall the stopper and rocker arm. Make sure the flange is tightly seated and in good shape. (Older tubs may have corroded flanges.) For more, see Bathtub Pop-Up Repairs. Water may leak or refuse to drain around a sink pop-up for a number of reasons. If your sink pop-up won’t pop up or seat properly, fixing it is quite easy—usually just a matter of adjusting a few parts. The culprit is often a buildup of hair around the base of the stopper or the pivot rod mechanism. Or, the clevis may be out of adjustment (see illustration to identify the various parts). Here’s how to fix the problem: With a slight twist, try to lift out the stopper. If it seems to be linked to the mechanism below, reach under the sink and unscrew the pivot rod retaining nut and pull out the pivot rod to disengage it. 2Lift the stopper from the drain. Clean off all hair and debris. If the stopper is broken or its seal looks worn, replace it. 3Face the hole at the bottom of the stopper toward the pivot rod’s location, and drop the stopper back into the drain hole.

Insert the pivot rod so that it engages the hole in the bottom of the stopper, and tighten on the retaining nut with the stopper in its up position. When the drain is closed, the pivot rod should slope slightly uphill from the clevis to the tailpiece. 4Loosen the set screw on the clevis and adjust the strap up or down so that it operates the pivot rod to open and close the stopper. Retighten the set screw. 5If adjusting the clevis screw doesn’t help, reset the pivot rod by squeezing the spring clip and freeing the pivot rod. Move the clip up to the next clevis hole and insert the rod. You may need to keep tweaking this a little to find the right hole on the clevis. 6If water drips from around the pivot ball, tighten the retaining nut that holds the ball in place. You may also need to replace the gasket or washer (or both) inside the pivot ball-and-rod assembly. Keeping drains clear of hair, soap and shampoo residue, and other debris is one of the best ways to help keep pop-up stoppers in good working order.