Installation Instructions For Delta Shower Faucet
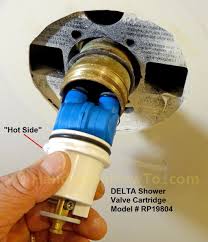
MultiChoice® Universal valve body only Accepts single, dual, or dual thermostatic cartridge Cartridge ships with trimSign In to ManualsOnline Sign Up for ManualsOnlineThe Delta control cartridge is located under the faucet handle. The Delta 13/14 series shower faucet is designed with an internal plastic cartridge that attaches to the faucet handle. When the handle is turned, the cartridge adjusts the flow and temperature of the water flowing from the faucet. Over time, the internal rubber seals of the cartridge wear down, causing the faucet handle to be hard to turn and allowing the cartridge to leak water. When these symptoms appear, it is time to replace the cartridge. Turn off the water supply to the shower faucet; you may need to turn off the main water supply to the building. Use an Allen wrench to loosen the set screw on the side of the faucet handle. Loosen the set screw by turning the set screw counterclockwise with the Allen wrench. Remove the handle by gently pulling it toward you.

Set the handle aside. Pull off the trim sleeve, which is the round tube just behind the handle. Under the trim sleeve is a circular bonnet nut that holds the cartridge in place. Using a plumber’s strap wrench or water-pump pliers, grasp the bonnet nut and turn it counterclockwise until it is removed. Set the bonnet nut aside. Grasp the faucet cartridge with your hands or with water-pump pliers and gently pull it toward you while wiggling it a bit. Set the old cartridge aside. After the cartridge is removed, some residual water may drain from the valve faucet body. As long as the water supply is turned off, this residual water is nothing to worry about and should stop flowing within a few seconds. Push the new replacement cartridge into the faucet body. One side of the cartridge is marked “hot side.” Spin the cartridge around so the side marked “hot side” is on the same side as the hot water inlet of the faucet -- usually the left. Push the cartridge into place until the small V-shape tabs on the sides of the cartridge are firmly set into the V-shape notches of the faucet body.
Replace the bonnet nut by turning it clockwise until it's hand-tight and then finish tightening it with the strap wrench or water-pump pliers; Replace the trim sleeve by pushing it back into place over the bonnet nut.
Esoteric T Shirt DesignsReplace the faucet handle and turn the set screw clockwise with the Allen wrench until the screw is snug.
Dance Studio Mirrors Los AngelesTurn faucet handle to the “off” position.
Sg Blue Air Purifier ReviewsTurn the main water supply back on. For easy installaton of your Delta® shower unit you will need to: Caring for a shower door is relatively simple. While there are a wide variety of bathroom cleaners available on the market, most cleaning needs are accomplished with regularly scheduled cleaning efforts using simple dishwashing detergent, warm water and a clean cloth or sponge.

If common bathroom cleaners sold today are used, care should be used to identify any harsh chemicals that might be included in the products. A list of chemicals that should not be used is found in the instructions in the glass cartons as well as on our web site. The glass features a special chemical coating on the inside of the shower glass called ‘Spot Guard’. This coating is applied at the factory using a special application process that cleans the glass, prepares the glass surface and bakes the coating onto the glass. A sticker is used to identify the correct side of the shower so it can be installed correctly. It’s strongly recommend that steel wool or other aggressive scrub brushes should not be used. These materials can mechanically damage the coating and possibly scratch the glass if used on the glass door panel. How to Inspect Your Glass Prior to Installation Sliding Shower Door Installation Sliding shower and bathtub doors can be easily installed with the right instruction and forethought.

Pivoting shower doors can swing into action smoothly with the proper direction and careful planning prior to installation. Sliding Tub Door Installation Sliding tub doors can coast into completion with the right guidance and sufficient preparation. Measuring & Tools Guide Handy information to assist in the design and installation efforts of your new shower. Everything you need to know about shower door parts and accessories is finally within reach. Find the right advice to give your new shower the proper care and love it deserves.So, you've selected or purchased the perfect new Delta® faucet for your home… now what do you do? Do you plan to install the faucet yourself, or would you rather rely upon the services of a professional plumber? For expert faucet installation, you should contact a licensed professional plumbing contractor in your area. However, if you're ready and eager to install your own faucet, Delta offers these helpful hints.

If you have not done this before, we suggest that you read the general faucet installation tips below. For instructions on installing your specific faucet, please follow the Maintenance and Installation instructions that were provided with your faucet. Items You'll Need for Installation: Silicone sealant — Plumber's Putty is not generally recommended Other Tools That May Come In Handy: How to install a Pilar Faucet Installing a kitchen faucet Installing a bathroom faucet Step 1: Position the Faucet Begin installing your faucet by placing the gasket and faucet in position on the sink. From under the sink, thread the plastic mounting nuts onto the faucet shanks. Be sure the large side of each plastic mounting nut is up. From the top of the sink, check the faucet and gasket position. From under the sink tighten the mounting nuts, making certain not to over-tighten which could damage the nuts and make them difficult to remove in the future.

Step 2: Attach the Water Supply Tubes Water is typically supplied to the faucet through water-supply tubes. Wrap the threads of the water-supply valve with plumber tape. Although most plumbers use only plumber tape, some plumbing supply manufacturers also recommend using plumber's putty. Thread the water supply nut onto the shut-off valve. Tighten the nut with a wrench. Wrap the threads on the faucet shank with plumber tape, and then thread the water supply nut onto the faucet shank. Tighten the nut with a basin wrench. Step 3: Connect the Faucet Lift Rod From the top of the sink, insert the lift-rod into the faucet. From under the sink, make sure the pivot-rod is in the down position. Insert the lift-rod into the lift-rod strap. From the top of the sink, make sure the lift-rod opens and closes the drain plug as desired. Make any needed adjustments by loosening the lift-rod strap screw and repositioning the lift-rod. If you need to connect the lift-rod strap to the pivot rod, slide one end of the spring clip onto the pivot-rod.

Make sure that both the pivot -rod and the lift-rod are in the down posittion. Insert the pivot-rod in the closest hole in the lift-rod strap. Slide the other end of the pivot-rod. Make sure the lift-rod opens and closes the drain plug as desired. Make minor adjustments by loosening the lift-rod strap screw and repositioning the lift-rod. Make major adjustments by removing the spring clip and moving the pivot-rod to a different hole in the lift-rod strap. Step 4: Flush the Faucet Anytime you work on plumbing, filings, chips, and other debris can fall into the plumbing pipes. This debris can damage the sealing surfaces inside the faucet and cause leaks. Remove aerator and black sealing gasket above it. Before turning on the water supply, make sure the faucet handles are open (on position) in order to remove the debris without causing damage. Open both water supply valves under the sink. Allow the water to run for 15 seconds. Close the faucet handles (turn off).