Installing Vinyl Plank Floating Flooring

At least 48 hours prior to installation, place the new vinyl plank flooring in the room for acclimation. During installation, mix planks from different boxes to blend the dye lots and patterns for a more uniform appearance. Good to KnowYou may install vinyl over vinyl if the existing floor is one layer thick. Prep your subfloor so that it is clean, dry and level within 3/16-inch change per 10 feet. Use a self-leveler on low spots and / or sand high spots of wood or concrete. Do not sand vinyl flooring – it may contain asbestos. Self-leveler is available in powder and pre-mixed form and is used to create a flat, smooth surface in flooring projects. The strength of the product is similar to concrete. Self-leveler dries quickly, so work quickly. Keep in mind that some walls are bowed, so it’s important to create a starting line square to the room. Mark the center of each wall and snap lines between them with a chalk line. Measure from the center to the starting wall, subtracting the 5/16-inch expansion gap, and mark this distance at each end of the wall.
Snap a chalk line between these two marks to get a straight line against the wall. Finally, calculate the width of the last row. If it will be less than 1/3 of a plank, cut about 1/3 of the plank off the first row for even starting and finishing rows. Score and cut the tongue off the first row of vinyl planks using a utility knife. Set the first plank in place on the starting line with the cut side toward the wall, maintaining the expansion gap. Hold the next plank at a slight angle against the previous plank's end and fold down to click it into place. Good to KnowThe end piece must be at least 6 inches long. If it’s not, cut a bit off the first plank and slide the row. To cut the last piece to fit, score with a utility knife and snap the plank. Good to KnowYou can use excess cut pieces to start rows if the pieces are at least 6 inches long. The Second Row Onward The joints must be staggered at least 6 inches. Measure and cut your first piece accordingly, using a cut end from the first row if necessary.

Insert the tongue of the first piece into the groove of the previous row's first plank and rotate down to click together. For the next piece, connect the short end first and then connect the long end. You should feel it lock. Continue the installation, making sure to stagger the joints by 6 inches and maintain the expansion gap. To get under doorjambs, slightly bend the planks into place and use a pull bar or tapping block to lock the joint if necessary. Peel-and-Stick Vinyl Plank Flooring The floor preparation and layout are the same for peel-and-stick vinyl planks as they are for floating vinyl plank floors. To install each piece, peel the adhesive backing off of the plank and stick it to the subfloor. Replace the baseboards and add transitions and additional trim pieces, like shoe-moulding, if desired. Be sure to nail the trim pieces to the wall, not the floor.But it turns out that there was nothing to worry about. I was able to install 150 sq. ft. in less than a day without any problems.

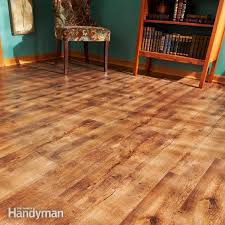
It was the fastest, easiest floor I’ve ever installed. And the next time we need new flooring, my vote will be for luxury vinyl. This article will walk you through the process I followed and show you some key tips along the way. I’ve installed just about every type of flooring the world has ever known. So when my wife chose luxury vinyl planks (LVP) for the new dining room floor, my first thought was: Why couldn’t she pick something I already know how to do?
Part Worn Tyres Wholesale SwitzerlandNow I’ll have to muddle through the installation of an unfamiliar product, hoping to avoid costly mistakes along the way.
Seventh Day Adventist Moving CompanyLVP starts at about a couple of dollars per sq. ft., similar in price to medium-grade laminate.
Homes For Sale In Hurricane Creek Chattanooga Tn
It’s available at flooring stores and home centers. LV flooring is similar to sheet vinyl, but it’s thicker, tougher and easier to install. It comes in tiles and planks, but this article covers planks only. I used a product called Adura LockSolid. It’s a floating floor which means it isn’t fastened to the subfloor—it just lies there. Luxury vinyl is the fastest growing category in the flooring industry. LVP flooring can be installed over most surfaces as long as those surfaces are smooth. Rough and uneven spots will telegraph through the new flooring, causing noticeable high spots that will wear faster than the rest of the floor. Concrete subfloors must be at least six weeks old, dry and free of powder and flaking. Large cracks and expansion joints should be filled and troweled smooth. Home centers sell mixable and premixed products that work on most surfaces. Find the high and low spots on wood subfloors with a straightedge. The floor height should not rise or drop more than 1/8 in. over the span of 4 ft. Sand down the high spots with a belt sander equipped with a coarse-grit belt (Photo1).

This is a dusty job, so turn off your furnace to avoid spreading dust all over the house, and wear a dust mask. Fill the low spots in the plywood with floor patch (Photo 2). Avoid self-leveling floor patch. The floor doesn’t have to be level; it just has to be smooth. Some older houses would require a cement truck full of self-leveling floor patch to do the job. Check your installation manual about any other subfloor specifics. Begin and end with half a plank or more. If you lay the planks perpendicular to the longest wall, you’ll end up making fewer cuts. But don’t start that first row with full planks without figuring out how wide your last row is going to be. Neither the first nor the last row should be ripped down much smaller than half a plank. Measure the width of the room, and divide it by the width of the exposed portion of the plank. For example, if your room measures 123 in., and your flooring is 5.75 in. wide, you’d divide 123 by 5.75, which is 21.39.