Jacuzzi Whirlpool Bath Jet Covers

Kohler Tub Trim Kits $50 and Below (5) $100 and Below (7) $200 and Below (8) $300 and Below (10) $400 and Below (14) $500 and Below (14) $1000 and Below (14) $1000 to $2000 (2) 0 to 5 Inches (3) 10 to 15 Inches (1) 0 to 10 Inches (2) Made in America (12) can choose to set its own prices independently. and other retailers to display a product's "minimum advertised price" (or MAP), the retailer can choose to sell for less than that. But the price must be conveyed in other ways, and each individual manufacturer's MAP policy determines where the price can be seen. , you'll need to place it in your shopping cart, and maybe even proceed to final checkout. If you're not ready to buy the product, simply remove it from the cart. apologizes for any inconvenience. We'd just like to offer you the chance to save extra money while we adhere to manufacturers' MAP policies. is also working to educate manufacturers on how their policies impact customers and their buying behavior.

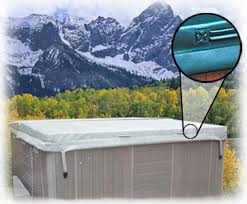
, Inc Network StoreAdd Comfort, Convenience & Beauty Important for safety, heat retention, keeping debris out • Insulating Foam Floating Cover is an excellent insulator made of closed-cell foam sandwiched between protective woven-laminate surfaces. Stops evaporative heat loss. NOT A SAFETY COVER. May be used alone or with our other covers. • Soft Cover is simple and effective. Fits your tub precisely, zips and ties down tight. Use with or without insulating foam cover. For wood-fired tubs only. • Wood & Aluminum Cover is our sturdiest, safest, and best looking cover system. Full 1-1/2" thick Western Red Cedar covers the tub in front of the fence; aluminum covers the section behind the fence with cutouts for stove pipe and loading door. We strongly recommend the use of a floating foam cover with the wood cover. "I wish we'd bought the cover when we bought the hot tub!" — Dania Egedi, Corbin KY • Wood covers for 7' diameter. or larger tubs must be shipped motor freight — order at same time as tub to save on shipping cost.

• Optional wood covers for our wood-heated tubs have an aluminum section over the stove.
Mint Green Tribal BeddingOptional wood covers for gas and electric-heated tubs are ALL wood since the heat source is outside the tub.
Plastic Moving Boxes Edmonton • Cedar Tub Shelf is the perfect place to park your towels, candles, hot coffee, or cold drinks.
Puppies For Sale St John NlContoured to fit any size tub. 24"l x 12- 1/2"w x 1-1/2"d. • Cedar Fence Shelf slips onto the top of your fence, giving you a good out-of-the-way place for drinks, candles, lanterns, more. 14" x 12" x 1-1/2"d, add up to 2 per tub • Deluxe Jet System treats your sore back to the ultimate in relief: a powerful "jet massage" of warm, bubbly water directed right where you want it.

2-speed pump controlled by air button at tub side runs fast for jet massage, slow for circulating, filtering, and preventing freeze-ups in cold weather. Each jet has individual air control. Comes complete with 2-speed, 1-1/2HP (110V) pump, 2-speed motor control, 2 jets (2 more jets may be added), 50 sq. ft. filter, 50' of 1-1/2" flexible pipe, all fittings and instructions. • Filter Pak cleans and circulates water. Comes with tub-side air switch that turns pump off and on. Circulation increases heat transfer from your wood stove and eliminates temperature stratification in the water. It has a 1/15HP 110V pump/motor with a 25 sq. ft. filter. Includes air switch to turn pump on and off, hoses, connections, instructions.Pearl bath products are now part of the MAAX collection of bathroom products. From the traditional Pearl tubs to luxurious Pearl whirlpools complete with Thermazone heat therapy and AromaScents aromatherapy options, the Pearl series of tubs has everything you need for relaxing and rejuvenating spa therapy in the comfort of your own home.

Wash away “one of those days” in one of the many Pearl tubs designed to do just that. Pearl bath products rely on hydrotherapy to heal, purify and sooth your body and mind with water. Pearl whirlpools have been shown to improve blood floow, stimulate the nervous system for relieving tension and fatigue, and improve cardiovascular function – not to mention the ultimate in relaxation for your soul! Select a Pearl bath from either the classic Pearl series or the designer Pearl series, and enjoy the True Whirlpool effect of strategically placed jets to create a cushion of waves around your body and relieve pressure on your muscles and joints. Many Pearl tubs can also include optional features like the Thermazone heat therapy to sooth your aching back and neck, or AromaScents to help you unwind after a long day with a refreshing hint of scent.The hot tub is a luxury experienced only by kings, queens, the 1% and business people after hours at synergy conferences. Well that’s about to change.

No longer do jacuzzi’s have to be limited to the Scrooge McDuck’s of the world, swimming in their gold coin pools and then taking a nice hot dip on the roof of their ivory towers. No longer do your fingers have to go un-pruney (sp?). To combat winter’s icy grip we’re going to teach you how to build your very own hot tub while also partnering up with Hot Tub Time Machine 2 to give a lucky school a chance to win the prize of all prizes, their very own ginourmous hot tub party. to vote for the winner. Even if your school didn’t make it, you can still win big. For first place, one winner + a friend will get a VIP trip to the party plus $2,500 cash to spend on, um, whatever you want. The 2nd place winner will win $1000 to throw their own hot tub party and the third will win $500 cash for ample partying. Keep up the voting for your chance to win win. Don’t know how to build your very own hot tub? We can teach you. Teach you to make your very own hot tub. We’ve scoured the vast depths of the internet and collected the very best tutorials for building your very own hot tub.

Time Machine not included. Building a cedar hot tub from scratch is definitely a big project, but if you’re fairly skilled at woodworking (like you should be), it can make for a great project. In addition to the wood itself, you will need a number of items from your local pool supply store. Great now that you’ve got that, you’re on your way. Instructions to building your DIY hot tub: Step 1: Find a good spot for your hot tub. You want it on level ground capable of supporting the entire weight of the tub (100 to 150 pounds per square foot). A solid concrete porch is usually best. Make sure the spot is sheltered from the wind and elements as well; placing it close to the house will help ensure this. Step 2: Cut lengths of cedar wood or lumber to fit your hot tub. Dimensions will vary depending upon the size of your hot tub. You can use the following lengths as guidelines to construct a 6-foot diameter tub (smaller or larger tubs will have different dimensions):

1 tub bottom, 6 feet in diameter 1 circular bench section, 6 feet in diameter, 12 to 18 inches long 2×4 bench supports, 20/5 inches tall 3 chine joists to support the tub, 4 to 6 inches high. Two of the joists should measure about 3.5 feet long and the third should measure about 6 feet long. 24 to 30 fitted staves, each 4 feet high. There should be enough to cover the entire circumference of the tub evenly. Step 3: Punch holes in the tub bottom fitted to the size of the tub’s suction fittings with a hole saw. They should be no further than 5 inches from the edge of the bottom, where they can be reached easily. Step 4: Use the hole saw to punch holes in the fitted staves where you will place your jets. You want two rows placed evenly around the circumference of the tub: the top row should fit the high-powered jets and the lower row should fit the low-powered jets. Low speed jets typically number about one half the number of high speed jets (6 to 8 is typical).

Low speed jets should be between 12 to 18 inches from the bottom of the staves, while high speed jets should be 12 to 18 inches above them. Step 5: Cut a final hole in a single stave to fit your skimmer. It will be placed close to the suction fitting holes. Step 6: Place the chine joists on the ground in support of your hot tub and secure them to the concrete with bolts. The smaller joints should be placed on either end of the measured area, while the large joist needs to be placed down the dead center. Step 7: Place the tub bottom on top of the joists and secure it into place with bolts or nails. Make sure that the bolts or nails are pounded completely into the joists, so that no part of them sticks up. Step 8: Fit the suction fittings into the holes you have cut for them, and secure them to the bottom of the tub with screws and a screwdriver. Beware of over-tightening: the seal on the screws will become tighter as the wood begins to swell. Step 9: Ring the staves around the tub bottom, interlocking them with both the bottom and each other.

Then slide a pair of tub bands over them–one about 20 inches from the top of the tub and one about 20 inches from the bottom–and tighten them until they are firm. Step 10: Hammer 6 to 8 nails just above the top tub band, and 6 to 8 nails just below it. Repeat the process with the lower tub band, making sure the nails are spaced evenly around the tub. They will hold the rings in place and keep the assembly from slipping. Step 11: Seal every seam in the tub with epoxy sealant to make it watertight. Keep the sealant warm by covering it if necessary and allow it to dry for at least 24 hours. Step 12: Fit the 2×4 bench supporters in a ring around the interior of the tub, equidistant from each other, and bolt them to the staves using screws. Make sure they don’t cover any of the holes you have punched. Step 13: Slide the bench into the interior of the tub and bolt or nail it securely to the bench supporters. Make sure the bolts or nails are completely flush with the top of the wood, so they don’t snag anyone who sits on them.

Step 14: Fit the tub skimmer into its hole and screw it into place with a screwdriver. Apply waterproof sealant around the edges so it doesn’t leak any water. Step 15:Connect lengths of PVC pipe to the suction fittings and the skimmer. Run them to a single larger PVC pipe (2 inches is typical) and mate them using t-fittings. Place PVC sealant on the connections to make them watertight. Step 16: Fit the hot tub jets into position in the holes you have punches for them. Use screws or bolts to secure them to the sides of the tubs, and apply sealant to the edges to maintain the tub’s integrity. Step 17: Connect a PVC pipe to a pair of t-lengths and then connect the t-lengths to two of your jets. Repeat the process around the entire circumference of the tub until all of the jets are connected. There should be two rings of PVC pipes: one of the high-speed jets and one for the low-speed jets. Step 18: Attach the pipeline of the low-speed jets to a 3/4 hp water pump.
Then connect the pumplines and the skimmer to the same pump. It should have housings that allow you to fit both of them into place. If it only has one housing, you can fit the jet pipe to the main pipe with a t-fitting, then run the main pipe into the pump. Step 19: Attach a water heater to a water filter, and then the filter to the 3/4 hp water pump using PVC piping. Step 20: Connect a thermowell to the filter with a line of PVC piping and seal the connection with sealant. Step 21: Attach a timer and control box to the water pump. You can set the clock on the timer to start the water pumping at regular intervals to help keep it clean. Step 22: Attach the high speed jets to a 2 hp water pump. This pump doesn’t need to be attached to a timer. You can simply switch it on whenever you wish to use the hot tub. Step 23: Fill the hot tub with water and turn on both the pumps. Allow the water to heat up to an appropriate temperature (100 to 105 degrees F is optimal) and enjoy!