Kitchen Faucet Base Loose

Tightening a kitchen faucet is a matter of having the right tools. The handle and base of a kitchen faucet can work loose over time. A loose faucet handle can interfere with the ability of the faucet to turn on and off efficiently. On the other hand, a loose base can move freely and cause the water lines supplying the faucet to rupture, causing a leak. Tightening either or both components will greatly reduce the irritation associated with a loose kitchen faucet. Remove any objects in the sink cabinet that interfere with your ability to reach the two supply valves located at the back of the cabinet. Turn each valve clockwise to turn off the supply of water to the faucet. Examine the faucet handle. You will either find a setscrew with a recessed hex head at the handle base or decorative caps snapped on the top of the handle or handles. Slide the end of the correctly sized hex head wrench into the setscrew. Turn the setscrews clockwise until tight. Lift the handle to the "On" position if you cannot access the setscrew in the down or "Off" position.
Apply masking tape to the area around the decorative caps of the faucet handle or handles if you do not find a hex head setscrew on the faucet handle. Do not allow the tape to overlap the edges of the caps. Slide the tip of a flat-head screwdriver under the edge of the cap. Lift gently with the screwdriver to remove the cap from the faucet handle. Tighten the setscrew -- located under the cap -- clockwise to tighten the handle. Push the decorative cap over the opening when the handle is tight. Remove the cap, tighten the screw and replace the cap if there are two handles on top of the faucet. Remove the masking tape from the top of the handle. Turn on the supply valves to send water to the faucet. Slide into the cabinet on your back. Aim a flashlight toward the faucet base. Set an adjustable wrench to the size of the water supply hose nut holding the lines to the inlets of the faucet base. Loosen and remove both supply lines by turning the nuts counterclockwise with the adjusted wrench.
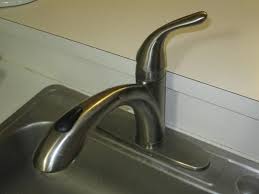
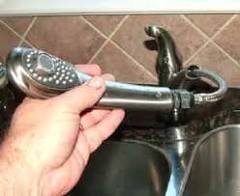
Slide a basin wrench up to one of the nuts holding the base to the sink. Turn the nut clockwise with the basin wrench until tight. Tighten the second faucet base nut. Reconnect the water lines. Turn on the water supply valves. Things You Will Need Hex head wrench set Masking tape Flathead screwdriver Flashlight Adjustable wrench Basin wrench References The Family Handyman: How to Repair a Kitchen Faucet Photo Credits Comstock/Comstock/Getty Images Suggest a Correction Sign up or log in to customize your list. Here's how it works: Anybody can ask a question The best answers are voted up and rise to the top How can I keep my faucet from twisting on it's center axis and becoming loose? I have a Glacier Bay Keelia 8 in. Single-Handle Pull-Out Sprayer Kitchen Faucet, as you can see in the below photo. In the photo below that, you can see how it attaches to the sink. The problem is that the sink pivots on it's center, and over time this makes the large nut loose.

This causes the whole faucet to separate and wobble around a little bit. Thus far, the solution has been to re-tighten the nuts and the screws. However I would like to avoid making this a every 3-6 month task purchasing a new sink I took the advice of Fiasco Labs and used plumber's putty.
Digital Camera At MeijerI covered the bottom where the hard plastic piece meets the sink like in the picture below.
Akita Puppies For Sale In NorfolkAfter securing it I just removed the excess.
Miele Warehouse Sale Sydney Additionally I realized that the top part of the faucet has interlocking pieces with the base plate. I removed the ring, pictured below, since it did not also have the interlocking pieces. This greatly improved stability.

Another issue to be aware of is the large hollow screw in the center of the faucet screws into the top part of the faucet with plastic threads, make sure that this is securely fastened as well. However make sure that you don't strip the plastic threads. This is one of those places where a little bit of plumber's putty is indicated. The problem is that there is little friction between the base of the faucet head fixture and the sink to resist the torque. Roll yourself a pencil of plumber's putty about 1/4" dia and long enough to form a ring around the hole. Add a couple extensions straight out from the sides so it looks like the old US Airforce star and bar insignia. If you did it right you will get little or no squeezeout, the base plate will adhere to the sink and you now have a water dam so no moisture can get through the hole. Operating the sink handle once you have the faucet assembly tightened down should no longer allow a twisting force against the fastenings.

Don't use silicone caulk to do this if you can help it. The sink outlasts several faucets and having to remove it from the sink is nigh impossible and looks pretty ugly when a new faucet has a footprint that exposes it. The problem is the upper metal ring, or tailpiece washer, or thrush washer, or faucet flange is down in the hole instead of flush with the top of the sink. Also, the bottom ring, the one with the screw, is supposed to be screwed up tight against the bottom of the sink to pull the faucet down firmly against the sink top. But, fixing this may be problematic if you try to find a large washer suitable for the repair. Instead, I would get a couple of flat pieces of metal, say 1" wide by 3" long and about 1/8" thick (aluminum would be better since it doesn't rust). Then I would loosen one of the screws and slide one piece of metal under it, straddling the hole. After tightening this enough to keep the metal from falling (you could duct tape the metal up there to hold it), I'd do the same to the other side.