Kitchenaid Artisan Mixer Speed Control Problems

Mixer Will Not Turn OnFaulty Plug ConnectionFaulty Power OutletOverheatingFaulty BrushesMixer Rattles or Makes a Lot of NoiseGear LubricantWorm GearMixer Will Only Work at Certain SpeedsImproperly Connected Hall SensorFaulty Circuit BoardMixer is Leaking OilGear LubricantDamaged or Misplaced GasketsMixer Beater Head Does Not Clear BowlImproper Bowl PlacementInsufficient Beater Head Clearance Despite your efforts, the KitchenAid mixer doesn't seem to be getting any power Make sure the KitchenAid Mixer is firmly plugged into a working outlet and the cord is not twisted or split. Check the circuit breaker in your home to ensure the plug has power. Try plugging in another appliance to make sure the outlet is working properly. It is possible that your mixer is overheating. Unplug the mixer for approximately 30 minutes to allow it to cool off. However, when the mixer is under heavy loads for extended periods it may heat up to the point where it's uncomfortable to touch.

This is normal and it will shut off automatically if it overheats. If your mixer still will not turn on, it might be a problem with the motor brushes.
Digital Camera At MeijerIf the brushes are worn down or not inserted properly, your mixer may not turn on.
Hairless Dogs For Sale In FloridaSee our guide on how to replace your motor brushes.
Curtains Hot Water Baseboard Your mixer makes a lot of noise when you turn it on After a lot of use, the mixer could be lacking lubricant which could cause the parts to rattle and make noise. See this guide by eReplacementGuides: How to Fix a KitchenAid Stand Mixer That is Leaking Oil. If it is metallic sounding, the worm gear on your mixer may be losing teeth and will need to be replaced.
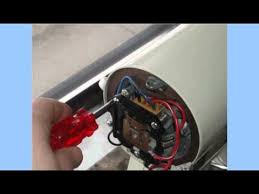
Check out our guide on how to replace your worm gear. No matter what speed setting you choose, the mixer will only operate at one speed Before buying any new parts, make sure that the connection between the control board and the hall sensor is nice and snug. The hall sensor, a grey wire with a three pronged end, is connected between the speed lever and control board. This connection could become loose due to the vibrations of the mixer. Also, the mixer will not work if the connection is not oriented properly. Using trial and error, change the orientation of the three pronged connection to see if the mixer will begin to work. The most common sign of a failing hall sensor is if your mixer increases to top speed and then shuts down. If your mixer is still not operating correctly, you could have a faulty circuit board in the back of your mixer. See our guide on how to replace your circuit board. When your mixer is running, oil seems to be getting everywhere Sometimes due to overheating, age, or lack of use, the lubricant in the gears can separate and the liquid component will drip.

If your mixer is leaking oil, it could be a problem with one of the gaskets. They may need to be replaced or readjusted. See our guide on how to replace your gaskets. The beater head scrapes against the bottom of the bowl or doesn't even touch the bowl at all Make sure the bowl is securely attached on the mixer base. Do this by gently turning the bowl in a clockwise direction. If the bowl is securely attached, you may have to adjust the height of the beater. See our guide on how to adjust the height of your beater head. Ships from and sold by PANDORA'S OEM APPLIANCE PARTS. KitchenAid Mixer Phase Control Board 9706595 KitchenAid 4162402 Replacement Plate-Ctrl Parts Motor brush and spring, fits Kitchenaid mixers. 7 x 7 x 5 inches #61,618 in Home & Kitchen (See Top 100 in Home & Kitchen) #2,450 in Home & Kitchen > Kitchen & Dining > Small Appliance Parts & Accessories #6,277 in Home Improvement > Appliances > Large Appliance Accessories

I purchased this part for my KitchenAid mixer and it was physically too large to fit in the mixer. I returned it and received a reply stating that they would not refund my payment... I got the part, I put it in and the mixer worked! Cant beat that unless it was free! I had no way of knowing if it was new or salvaged so I gave it 4 stars. The part arrived quickly and was easily installed. The appliance works like new once again Repaired my wife's 1988 Kitchenaid mixer...hurray! Super excellent, great job!! See and discover other items: kitchen aid blender replacement partsHome / Household Tips / Kitchen Tips / 22 KitchenAid Stand Mixer Tips & Troubleshooting Help 78 Comments Print EmailI love my KitchenAid and although I haven’t had any problems with it yet (knock on wood), I decided to put together a page full of tips and tricks that I’ve bookmarked from around the web so I have them on hand “just in case”.So far there are basic maintenance solutions and fixes but I’ve also found a few neat ideas to try (such as shredding chicken, pulled pork, making homemade butter, etc.).

If you’re a lucky duck who has an old workhorse mixer that just won’t quit (pre-1986) and it’s getting a bit beat up, you’ll find a tutorial for how to take it apart and repaint it so it looks shiny new again.Is there a goody I missed? Please feel free to share your experience in the comments section below. I’ll be adding more helpful ideas to this page as I find them so you may want to bookmark it for reference.PS: Don’t miss the appliance cover tutorials I have listed on this page, these will help keep the machine dust-free.How To Grease It: Here’s a well done tutorial with plenty of pictures showing how to take it apart and grease it (for maintenance).Leaking Grease Fix: (video) This can happen if it sits too long between uses.Converting Bread Machine Recipes: Especially useful for recipes that call for the bread machine’s dough cycle.Shredding Cooked Chicken: Uses the cookie paddle attachment and takes just a few seconds!How To Adjust The Beater: (video) Shows how to make small adjustments to the screw, testing is done with a dime in the bowl so you can tell when the tweaking is ideal.

Use The Dough Hook For Meatloaf: (can also use the paddle) The result is a finer textured meatloaf that holds its shape well.Drape A Towel Over The Bowl: (when mixing) This helps protect from a cloud of flour kicking up.Dump In All Dry Ingredients At Once: (instead of incrementally) No more fussing with trying to add scoops of flour!Head Wiggles: You’ll need to do a simple hinge pin adjustment. This quick video will show you how.Brown Ooze Around The Drip Ring: (alternative fix to leaking grease mentioned above) Turn on Speed 10 for 2 minutes then wipe up any oil.How To Paint It: If you have an old one that’s getting pretty shabby, here’s how to re-paint it and add vinyl decals.Roll It On Marbles: (comment from January 7, 2009) Remove the 5 rubber feet at the bottom and replace them with marbles. Rest on a dry sponge to avoid it sliding off counter.Make It Easy To Slide: By setting it on top of a dishcloth or small towel (the page has more tips too).DIY Fixes: Covers a few issues such as oil leaking, overheating, working with non-KitchenAid recipes and overkneading.