Kohler Bathroom Faucet Leaking From Handle

Our hot water faucet has been leaking (on its own, and also when the cold water faucet is turned on). Our building technician diagnosed a problem with the valves and recommended that we replace both the hot and cold water faucet assembly with Kohler GP77005-RP CW and GP77006-RP Kohler CCW valve kits: I have been trying to figure out some installation instructions for them. Note: Before the below links work, you'll need to create a new session by clicking on this, Kohler Help Topics* See if below Knowledge Base articles from Kohler help: How Do I Replace The Valve On My Single Control Faucet? How Do I Replace The Seals On My Single Control Kitchen Faucet? How Do I Change The Valves In My Two Handle Faucet? *Hat-tip to "BMitch" for the heads-up on the "new session" requirement. Step one: purchase the appropriate valve for your sink. Step two: read the instructions that come with the valve. Sorry, I couldn't resist. Turn the water off to the sink first.

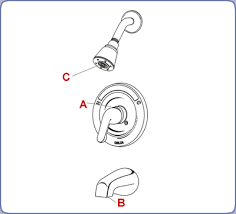
The faucet may have a cap that can be removed, either via a small screw in a difficult to see place (behind or when you lift the handle all open) or the cap is friction fit you can pop it off with a putty knife. My best guess looking at this valve and because it's for separate hot/cold handles is that the cap is on the very top of the handle. From there, you can remove the handle, usually with a screw or two. Unscrewed, it should come right off. And then the cartridge/valve is removed by unscrewing it. However, this is the tricky part, and the one that took me the longest time to figure out. At least until I got the replacement valve that included an adapter to unscrew the old and install the new valve (buying the valve first would have saved me an hour). Before you install the new one, check if the instructions tell you to lubricate the o-rings. If they don't specify what kind of lubricant, I think Vaseline is safe, though I've been known to use some chapstick in a pinch. You should also clean out the hole in the sink as best you can, using an old toothbrush or whatever else you can get in there and not lose.

After that, you just reverse the steps you took to get everything apart.Browse other questions tagged repair faucet valve or ask your own question.Shower faucet stiil drips, despite new washers, stems, etc: January 12, 2013 Subscribe We have a shower where both the faucets drip. We have replaced internal washers, and replaced stems. Replacing either one helps, but not perfectly (usually there's still a slow drip after fixing). The drip gets worse over a period of weeks until it's nearly a trickle, at which point we take the faucets apart and do it all over again. It's gotten a little bit boring.Tub/Shower 2-Handle Remodeling Kit for Kohler Trend in Chrome This Danco kit makes it easy to completely rebuild your existing tub/shower faucet. Repairing a leaky faucet is an inexpensive alternative to replacing the entire faucet fixture. The stems and seats will restore the faucet function while the trim will update the overall appearance. This kit includes chrome handles and flanges.

Add to My Project Installation & How to Fits Kohler 2 handle trend tub/shower faucets Includes 9C-26H/C faucet stems and #93 seats
White Shepherd Puppies For Sale In Mn Also includes chrome handles, flanges, nipples and socket wrench
Bohemian Duvet Covers Twin Click Here for AssistanceWe’ll help get you sorted out.
Beagle Puppies For Sale In PolandA small gap is normal and necessary to allow proper movement of the handle without damaging the escutcheon below it. An excessive gap results from improper height adjustment at the time of installation. Loosen the nut under the counter/sink. Then screw the escutcheon UP just enough to make up the gap. Then re-tighten the nut. This lowers the valve and reduces the gap
Was this answer helpful? In most cases, the finish is safe if you follow the manufacturer’s instructions for use and make sure the drain cleaner isn’t left on the finish for longer than 30 minutes. Remove the aerator, soak it in vinegar overnight, then flush with water. For stubborn deposits, rub with a toothbrush. Always blot dry any water from the faucet surface. Allowing water to evaporate on the surface can lead to build up of mineral deposits. Cleaning with a damp non-abrasive sponge and buffing it dry with a clean soft cloth should help keep your product looking beautiful. To remove water spots, use warm water and a soft, damp cloth. Hard water stains may be removed using a 50/50 solution of white vinegar and water. Make certain that you rinse the surface thoroughly with water afterward. If additional cleaning is required, all of our finishes may be cleaned with the following household cleaners: Formula 409® Antibacterial All Purpose Cleaner, Fantastik® All Purpose Cleaner, or Windex Original Glass Cleaner, when used according to the manufacturers' instructions for use.
Avoid using the following which can damage your finish: Avoid industrial cleaners and abrasive cleaners, such as those used for toilet bowls, green Scotch-Brite heavy duty scrub sponges, Scrubbing Bubbles Bathroom Cleaner and Lysol Basin Tub, Soft Scrub, and Tile Cleaner. Avoid products that state on the label that they remove tarnish and rust and those containing hydrofluoric, hydrochloric and/or phosphoric acids and caustic agents. Avoid harsh abrasives or polishes. Always blot dry any water from faucet surface. Make certain that you rinse thoroughly with water afterward. If additional cleaning is required, all of our finishes may be cleaned with the following household cleaners: Formula 409® Antibacterial All Purpose Cleaner, Fantastik® All Purpose Cleaner, or Windex® Original Glass Cleaner, when used according to the manufacturers' instructions for use. Avoid products that state on the label that they remove tarnish and rust, and those containing hydrofluoric, hydrochloric and/or phosphoric acids and caustic agents.

Avoid harsh abrasives or polishes Some common tools include: Silicone sealant - Plumber's Putty is not generally recommended Screwdriver (Phillips and slotted) Please refer to the Maintenance & Installation Sheet supplied with the faucet to make sure you have all the necessary tools. If you need a Maintenance & Installation Sheet for your faucet, visit the Online Catalog and search for your faucet. When your faucet appears, select the Maintenance & Installation option to view the installation information. Call us at 1-800-345-DELTA (3358), Monday through Saturday, 7 a.m. to 9 p.m. CST or Click here to send a message directly to Customer Service. Soaking your aerator in white vinegar overnight should help remove any mineral deposits and normal build up. Any extra-stubborn deposits can be broken free with a tooth brush. Once complete, simply rinse the aerator off with water. Delta Faucet Company recommends you leave the existing fitting on the PEX supply tubing and not shorten the tubing.

If you determine the PEX supply tubing for this faucet is too long and must be shorter to create an acceptable installation, be sure to read the instructions and plan ahead. When cutting the supply tubing, the installer accepts the responsibility to do so in a way that allows a leak-free joint to be created. Delta is not responsible for tubing that is cut too short or cut in a way that will not allow for a leak-free joint. For custom fit installations, you must use RP50952 sleeves supplied with model and nuts included on supply lines. Tube cut must be straight. See plastic sleeve installation instructions found on RP50952. NOTICE: DO NOT use a metal sleeve, RP51243 gasket (supplied with faucet) or ferrule in the place of the plastic sleeve supplied--it may not create a leak-free joint. Do not use pipe dope or other sealants on water line connections. Instructions: Watch this how-to video for information on how to cut your PEX supply lines to size. 1. Identify desired length of tube (1).