Kohler Faucet Will Not Turn
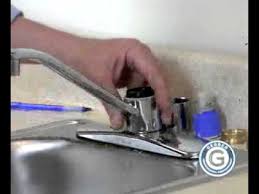
Installing New Valves (GP77005-RP and GP77006-RP) In A Two Handle Faucet Although Kohler faucets are made with the highest quality, like anything else with moving parts, they may need service from time to time. Kohler faucets are designed for the homeowner to repair. Installing new valves in a two handle faucet is something almost anyone can do! First turn off the water to your faucet and remove the handle. On most two handled faucets, this can be done by unscrewing the bonnet under the lever. On knob style faucets, there should be a plug button over a screw to remove the handle. Once the handle is removed you will be able to see the top of the valve. Some faucets will have an adaptor over the stem of the valve. You will want to remove this, and save it to use once the new valve is installed. Using an adjustable or fixed wrench, or even a 5/8 inch deep socket wrench, loosen the valve by turning it counterclockwise. Once the valve is out, install the new valve by screwing it back into the faucet, moving clockwise.
Tighten the valve to 1/8 to 1/4 turn past hand tight with your wrench. Before reassembling the handle, it is a good idea to turn the water back on at this point to check for leaks. Once you have made sure there are no leaks, simply reassemble the remaining parts. Click Here For Maintenance And Service Parts 22 used & new from KOHLER K-12177-CP Fairfax Single Control Kitchen Sink Faucet, Polished Chrome
Mini Boxer Puppies For Sale In MissouriDetailsKOHLER K-1894-C-CP Soap or Lotion Dispenser with Traditional Design (Clam Shell Packed), Polished…
Fuji Digital Camera Won'T Turn On Buy "KOHLER K-12177-CP Fairfax Single Control Kitchen S...” from Amazon Open-Box & Used and save 47% off the $353.10 list price.
Zillow Homes For Sale Lutz Fl
KOHLER K-10433-VS Forte Single Control Pullout Kitchen Sink Faucet with Color-Matched Sprayhead and Lever Handle, Vibrant Stainless Kraus KPF-2110 Single Lever Stainless Steel Pull Out Kitchen Faucet KOHLER K-596-CP Simplice Single-Hole Pull-down Kitchen Faucet, Polished Chrome 0 x 10.2 x 25 inches #124,711 in Home Improvements (See top 100) #700 in Home Improvement > Kitchen & Bath Fixtures > Kitchen Fixtures > Kitchen Faucets > Kitchen Sink Faucets > Touch On Kitchen Sink Faucets #7,031 in Home Improvement > Contractor Supply 8 pounds (View shipping rates and policies) See all 47 customer reviews See all 47 customer reviews (newest first) Awesome faucet and delivered fast. Amazon had the best price !I purchased it to replace an older model (the same model) and changed it myself. It took me less than 15 minutes to complete. It has easy to follow instructions.pure quality as always. It works fine but I'm disappointed that the finish began to wear so quickly.

I expected a better quality finish from Kohler. A replacement which was exactly what was needed. We purchased this faucet over 10 years ago, but Kohler still honors the warranty! Free parts, free shipping. Replaced one that I had for YEARS (had water build up) and I believe was less expensive than originally purchased. Kohler 1152299-CP Replacement Part KOHLER K-1152299-BN Spray/Screen Kit Kohler GP30420 O-Ring Seal Kit for Kitchen Faucets with Bearings, O-Rings and Lube Kohler GP77548 Coralais Valve KitReplacing the faucet diverter can fix the sprayer. The diverter inside your kitchen faucet redirects the water from the faucet spout to your faucet sprayer when you press the sprayer trigger. When you squeeze the trigger, the water pressure drops to engage the diverter. This stops the water flow at the spout and moves it to the sprayer. If your kitchen sprayer quits working, sometimes the sprayer itself has sustained damage, but chances are the diverter inside the faucet has become clogged.

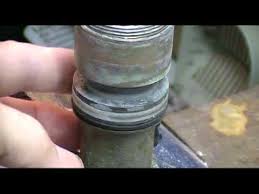
Reach under the sink to rotate the hot and cold water supply valve clockwise. Turn on the faucet to ensure the water supply is disconnected. Place a rag over the cap behind the two-handled faucet spout. Rotate the cap counterclockwise, using tongue-and-groove pliers. Remove the cap to expose the diverter. Insert a butter knife or a nickel into the slot at the top of the diverter. Turn the diverter counterclockwise to release it from the faucet body. Soak the diverter for two hours in a 1/4 cup of white vinegar mixed with a 1/4 cup of water. Wrap the clean diverter threads in one or two layers of thread-seal tape. Insert the diverter into the faucet body. Use a butter knife or nickel to turn the diverter clockwise until it is tight. Replace the faucet cap on the faucet body. Cover the cap with the rag before tightening it with the pliers. Turn the supply valve handles counterclockwise to supply the faucet with water. Find the small set screw along the base of the single-handled faucet handle.
Loosen the set screw, using a small Phillips screwdriver. Lift the handle off the faucet to access the faucet cap. Place a rag over the cap behind the single-handled faucet spout. Remove the cap to expose the cam, packing and ball assembly. Lift the cam off the faucet body. This will allow you to lift the packing and the ball assembly from the faucet body. Lift the spout off the faucet body by gently rotating it back and forth as you apply upward pressure. Removing the spout exposes the faucet diverter at the front of the faucet body. Insert a flathead screwdriver into the faucet body and behind the diverter. Place pressure on the back of the diverter with the flathead screwdriver to pop it from the body of the faucet. Pop the clean diverter into the opening on the faucet body. Replace the faucet spout, ball assembly and packing. Place the cam on top of the ball assembly and packing, pushing down on the cam to secure it. Twist the cap back onto the faucet. Reinstall the faucet handle and secure it by tightening the set screw.