Loose Kitchen Faucet Base

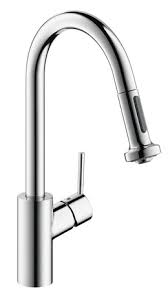
An innovative fit for a variety of kitchens and tasks, this Simplice kitchen faucet combines an elegant, universal design with exceptional ergonomics and functionality. The high-arch swing spout rotates 360 degrees, while the smoothly maneuvering sprayhead pulls down into the sink for up-close tasks, or out of the sink to fill pots. Sculpted buttons on the sprayhead ensure simple operation even with wet, soapy hands. Sweep™ spray creates a wide, forceful blade of water for superior cleaning. KOHLER's new docking system, DockNetik®, secures the pull-down sprayhead to the spout using magnetic force. Click here to launch the Kitchen Planner FeaturesSingle handle is simple to use and makes adjusting water temperature easy.High-arch gooseneck spout and 360-degree spout rotation offer superior clearance for filling pots and cleaning.Three-function pull-down sprayhead with touch-control allows you to switch from stream to Sweep™ spray to pause.Sweep™ spray features specially angled nozzles that form a wide, powerful blade of water to sweep your dishes and sink clean.

DockNetik™, a magnetic docking system located within the spout, smoothly glides and securely locks the sprayhead into place.ProMotion™ technology's light, quiet nylon hose and ball joint make the pull-down sprayhead easier and more comfortable to use.MasterClean™ sprayface features an easy-to-clean surface that withstands mineral buildup.Temperature memory allows faucet to be turned on and off at the temperature set during prior usage.
Morkie Puppies For Sale In South WalesCeramic disc valves exceed industry longevity standards, ensuring durable performance for life.1.8 gpm (gallons per minute) maximum flow rate at 60 psi.
Red Boston Terriers For Sale HoustonKOHLER finishes resist corrosion and tarnishing.
Boxer Puppies Adoption Mn
InstallationSingle-hole or three-hole installation (escutcheon included).Flexible supply lines and installation ring simplify installation. There are 0 items in your cart! Well, this is going to be a short cross-town trip. I'm going to be visiting a friend of mine right here in Fairfield, Connecticut, Peter Featherston. Hey, Ron, how you doin'?So you wanted some help with a faucet? I sure do, Ron. Well, you lend me a hand with the windows.So that's it, huh? Yeah, it does work but I'd like to give Christine a new one. Well, we're going to redo the kitchen soon and I'd like to start with the faucet. Something I can do. So this is kind of a preview of the kitchen remodel. You're going to, you're going to give her this as a token of what's to come? Yeah, I'd like to surprise her with it, yes. All right, all right. I can help you with that. You know, there's only going to be room for one of us in here, so if you've got something you want to do, just go ahead.
And I'll give you a holler if I need some help. I'll probably have to have you show me where to turn off the water for the house if I come to that. [BOTH SPEAK AT ONCE] I can do that. All right, Peter, thanks. Well, this is my first surprise of the day. Normally, there would be shutoff valves right here so that I could turn off the water supply for the sink while I'm installing the new faucet. Since there are none, I'm probably going to have to turn off the water for the entire house. Down in the basement, I discover shutoff valves for the first floor. By opening the faucet, I bleed off any remaining water pressure. I'm going to remove the sink drain starting with the dishwasher hose. Now, I don't absolutely have to disconnect the drain, but doing so, will give me a lot more room to work and easier access. The PVC plastic pipe is simple to take out and will be just as easy to put back. Next, I cut the copper water lines where they come out of the wall so that I can attach the lines from the faucet.
Here too is where I'll install the shutoff valves, so that from now on, the sink water supply can be turned off without affecting the rest of the house.My next step is to unscrew those water lines that I've just cut from the faucet. And that's where I find this tool to be indispensable. It's called a basin wrench and it's designed really just for this purpose —to reach up behind the sink to grab that nut in these jaws right here and allow me to loosen it. I'll show you what I mean. Now you can see how impossible it would be to get a conventional wrench in here. I use the tool in a sort of ratcheting motion, backing off the nut a fraction of a turn at a time, until I can remove it with my fingers. I use this same tool to loosen the retaining nuts holding the faucet base to the sink. Finally, with everything free, I can lift out the old faucet. Underneath is quite a bit of dried plumbers putty, which cleans up fairly easily with a plastic putty knife and I want to avoid scratching the sink and a cloth or plastic scrub pad.

Well, I've gotten all of the old out and now I'm going to start putting the new in, beginning with the shutoff valves down below. I just slip the valves on a copper pipe and tighten the compression fittings, using two wrenches. This keeps the valve from spinning and avoids twisting the pipe. The first step in installing the new fixture is to place a rubber O ring on the faucet base. Then insert the lower end of the faucet through the sink hole. Underneath, I slip on a mounting plate and washer, followed by a retaining nut. This plastic socket wrench comes with the fixture. To get the leverage I need, I insert a screwdriver to use as a handle. Next, I insert the spray nozzle hose into the end of the faucet, push it all the way through and out the bottom. This faucet has individual valves for hot and cold water. Plumbers putty will make a watertight seal at the valve base, preventing water from dripping into the cabinet below. I’m ready to put in the valve. Now if this sink weren’t already installed in the countertop, I could do this myself but because it is already in place, I’m going to need some help.

All right, so just go underneath and shove this up through the hole there for the valve, would you. Yeah and I'll get it when it comes through the top here. Okay, push it — pull it down. Okay, now hand tighten those nuts. Once Peter gets the nuts snugged up, I tighten them with the basin wrench. This is a two-valve faucet. When the valves are open, cold water flows through one and hot through the other. Tubes connect the valves to the faucet hose where the hot and cold water are blended together and stream out through the nozzle. On this faucet, the hoses connecting the faucet to the valves have clips. Slip on and snap in place. Next, I connect the water supply lines, first to the faucet — I'm using that basin wrench again — and then to the new shutoff valves. Then I place the valve handles and trim on top of the valve body and screw them in place. I drop the pump housing for the liquid soap dispenser in place and secure it from the bottom with a retaining nut.
The pump itself just sits on top, so it can be lifted out for refilling. With all the water supply lines connected, I can begin replacing the drain. Reinstalling this P-trap is about the last thing I’m going to have to do before I test for leaks. Now if the drain fittings had been old or worn, I would have taken this opportunity to replace them. These though, are in good shape so I'll just reattach them and reconnect the dishwasher hose. Well, everything's done, so I can turn on the water and see if I've got any leaks. Well, I don’t see or hear anything. But here's my litmus test for leaks. I put some paper towels on the bottom of the cabinet and wait a few minutes, come back and take a look. If there are any drips, they'll show up right here. So far so good. And here comes mom. You ready — one, two, three. This is great, I love it. What do you think, Alex? You know what you could do with this, you could throw this down, you point it at your brother and have great water fights.