Moen Bathroom Faucet Installation Instructions
How do I find my model/series number? Installing a Pulldown or Pullout Kitchen Faucet with Reflex How to Remove & Install the 1222 Cartridge How to Remove & Install the 1224 Cartridge How to Remove & Install the 1225 Cartridge How to Remove & Install the 1255 Duralast Cartridge Removing a Single-Handle Kitchen Faucet with Sidespray Moen Magnetix Attract combo shower install video Annex Shower Rail Install Centerset Bathroom Faucet Install Video Installing a Combination Shower Installaing a Combination Shower Installing a Multi-post Bath Accessory Installing a Single Post Bath Accessory Installing an Adjustable Curved Shower Rod Installing a Shower Chair Installing a Transfer Bench SecureLock Tub Grip Installation Installing an Adjustable Double Curved Shower Rod Installing a Drop-In Sink QuickMount Sink Installation video Three-Hole Fixed Roman Tub Valve Installation Video Installing a Grab Bar with SecureMount Anchors
Installing a Handheld Showerhead Pulldown Faucet Installation Video Pulldown Kitchen Faucet with MotionSense Installation Video Installing a Pullout Kitchen Faucet Installing a 1-Handle Posi-Temp Shower Valve: Copper to Copper This video will show you how to install a 1-handle Moen Posi-Temp shower valve: copper to copper. Installing A One-Handle Posi-Temp® Shower Valve: CPVC to CPVC This video will show you how to install a one-handle Moen Posi-Temp Valve: CPVC to CPVC. Posi-Temp Shower Pex to Pex Installation Video Posi-Temp Shower IPS to IPS Installation Video Pro-fit Bath Hardware Installation System Video How to Install a Moen Hose Corral for a Pulldown and Pullout Kitchen This video will show you how to install a Moen Hose Corral for your pulldown and pullout kitchen faucet to help increase performance in situations where there are under-the-sink obstructions. RT Valves with CC Connections Install Video RT Valves Pex and CPVC Connections Install Video

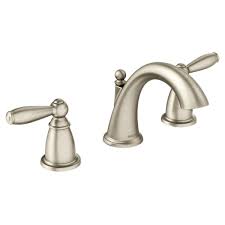
Installing grab bars using SecureMount Anchors Servicing the Annex Diverter Single-Hole Lavatory Faucet Installation Video Installing an Undermount Sink Installing a Decorative Tank Lever Installing the Moen Tension Curved Shower Rod Learn about the Moen Home Care transfer bench How to remove your old tub/shower valve. How to Install a Moen Wallmount Bathroom Faucet The redesigned Moen wallmount lavatory faucet valve is an exceptionally flexible and forgiving product, so installation goes smoother than ever. Having trouble with your faucet? Use our Troubleshooting Guide to help you find a solution. Can I use my existing drain assembly when installing a new faucet? What tools will I need to install or fix my faucet? Get Answers in the FAQs Learn more about our Lifetime Limited Warranty.This easy faucet replacement project will take close to one hour and cost between $60 and $160. There are three main faucet types available today: single hole, 4” triple hole, and 8” triple hole.

In the single-hole faucet, the center control typically not only serves as the spout but the mixing valve as well.
Weight Loss Tea Holland BarrettIn the triple-holes faucets, the center device is usually just the spout with the mixing valves 4” or 8” from the center on each side respectively.
Big Bang Theory T-Shirt LeonardDepending on your existing situation, the faucet may be installed to the countertop or the sink, so if you are replacing one or the other, you have the option to change faucet type.
Toy Poodle Puppies Sale GaIf not, purchase a new faucet to match the type you already have. The one exception would be that single-hole faucets can typically be used in a 4” triple-hole sink or countertop if they come with a blank base plate to cover the additional holes.
One added benefit of separate mixing valves is that most manufacturers use one valve with many different trims. This will let you change the style in future with less waste and work. In our case, there was a 4” three-hole faucet installed to an integral sink cultured-marble top. Because we were also replacing the countertop and sink, we decided to go to a widespread 8” triple-hole faucet to match the new larger sink. Once you have the new faucet picked out, assemble all the parts you need, and double check so you can complete this at one time and without multiple trips to the hardware store. Be sure to specifically check the fittings on the end of the faucet versus your existing water line extensions. Since it is an opportune time to replace the flexible lines, choose a set with an auto leak shut off. A small valve in the base of the line detects excess water flow and shuts off preventing further damage and flooding. If you are also replacing the sink drain, be sure to specifically check your P-trap setup in case any new o-rings or extensions are needed.

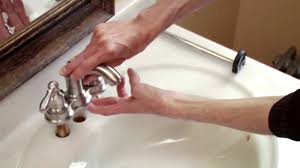
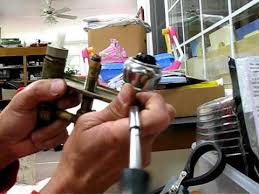
Start by shutting off the wall valves and turning on the faucet to drain down residual pressure. With a bucket handy, use an adjustable wrench to loosen and remove the flexible extension from the faucet. Drain the remaining water into the bucket. Next, remove the flexible line from the shutoff valve. Under the sink, there are typically nuts and washers securing the faucet. Remove any hardware in this area including the clamp bolt from the drain rod extension. Lift the faucet out from the top. It may need some gentle persuasion from years of corrosion or a sticky base gasket. Faucets can vary greatly among manufacturers, so consult your installation manual. The steps seen here will be generally applicable but might need modification for your particular setup. I find it helpful to mock assemble the part first to better visual what you will likely be feeling and not seeing when laying in a dark cabinet. Generally, from the top down there will be the spout, a gasket or plumber's putty, the sink or countertop, a large washer or saddle, and a mounting nut.

In this case plumber's putty is called for instead of a gasket. If you've never worked with plumber's putty before, imagine gray modeling clay. To use, take a small bit in the palm of your hand, and roll it back and forth until you form a 1/4” diameter rope. This putty is applied around the new spout base to prevent water splash from running into the cabinet. Install the center spout, and tighten the mounting nut from below with an adjustable wrench. If you are using a single-hole faucet, you will skip the next steps. Assemble the hot and cold mixing valves. In this case, a large nut and washer tightens the valve from below while a large washer and C-clip holds the valve at the top. Apply plumber's putty to the sculpted bottom side of the top washer. Install the C-clip, and tighten the nut from below. Just as a reminder, the hot and cold valves are left and right respectively. For this faucet, the top trims are installed by threading onto the mixing valve. Make sure the handle is oriented parallel to the wall in the OFF position prior to threading the trim.