Pipe And Drape Techniques
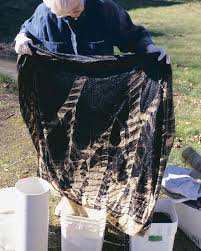
Sign up for FREE emails Free Tutorial: Make a Sewing Machine Cover Video: How to Make Pleated Trim from Petersham Watch Threads Essential Techniques Videos Video: DIY Pumpkin Costume Project [Sponsored by Baby Lock] Threads Insider All Access Video: How to Shape Petersham Ribbon to a Curve Video: Adjusting a Sleeve for a Forward Shoulder Video: How to Straighten Fabric Grain Video: How to Sew Piping to a Curve Complete Guide to Seams and Seam Finishes Watch the Teach Yourself to Sew Video Series Sewing Terms to Know 12 Buttonhole Tips and Techniques Threads - for people who love to sew by Lois Ericsonfrom Threads #72, p. 67Derived from the ancient Japanese resist-dye art of shibori, wrapping loose folds of fabric with string around a plastic PVC pipe (or pole, bottle, or the like) can create exciting patterns. Start by dividing the fabric into roughly even segments and taping them around the top edge of the pipe, then wrap the fabric with a continuous length of string, allowing the fabric to fold up randomly or regularly underneath (left).

Stop occasionally to scrunch up the wrapped portion (right) so it will be covered easily when dipped. When the dipped fabric looks "done" (left), unwrap it before rinsing, neutralizing, and rerinsing. The finished fabric is at right. More on dyeing fabric: Dyeing with Bleach Resist-and-Spray Technique for Dyeing FabricWrap-and-Dip Technique for Dyeing Fabric Posted on Oct 28th, 2008 in design, fabric, embellishments, getting the look, fabric, fibers, art-to-wear, printing, stenciling When fitting a full bust, consider adding two or more parallel side bust darts. Multiple darts spread the dart shaping over a larger area, which is helpful on a rounded bust shape. Several smaller darts also reduce the chance that a "bubble" of fabric will form at the dart point.Fit a garment on the body to customize the multiple darts. Pinning in multiple darts on the figure enables you to accurately place the shaping where the bust calls for it, by using more dart take-up on the upper or lower dart.

This technique is demonstrated by Sarah Velben in this video excerpt from her DVD Create a Master Bodice Pattern (The Taunton Press, 2015.) A single straight side dart isn't always the best tool for fitting a full bust. Consider dividing the dart take-up for a smoother contour. Posted on Sep 2nd, 2016 in sewing, online extras, All How-To, tips & tricks, All Videos, Threads #187, darts, Sarah Veblen, draping, bust dartsQuik Stage is a Manufacturer and Distributor of Portable Stage, Plexiglas / Plexiglass Stage, Crowd Control Stanchions, Seating Risers, Choral Risers, Pipe & Drape, Table Skirts, Table Linens, Lecterns, Podiums, ADA Ramps, Trussing, and Mobil Tech and Global Truss Crank-Up Lifts.Many sizes, plus an angle deck. Retractable Stanchions in many sizes and colors. Sign Brackets and other accessories. Chrome, Black or Gold with Velour or Braided Ropes. 1 Curved & 2 Straight Versions. Perfect for Back Drops, Room Dividers or Trade Show Booths.In-Stock for Quick Shipping.

Skirting Clips In-Stock for Immediate Shipping. Clips Available for Most Tables. Line Array and Standard Lifts in stock. Quick Connect & No Tools Needed. Circles, Junctions, Screen Frames.We offer 34 color choices in any height, made to order. Transfold Standing Choral Risers. Perfect for Schools or Churches. Seated Choral Risers, Straight or curved.
Teacup Yorkies For Sale In Long IslandLots of options to fit your needs.
Changing Headlight Bulb Mitsubishi Lancer Available in 3 Pleat Styles: Shirred, Box & Continuous Pleat.
Australian Shepherd Puppies For Sale In Ok34 Color Choices in Wyndham plus other fabrics available. Amazing Stage Fabrics in Motion An extensive range of stage and event a fabrics, tested according to international accepted standards.

The world's largest front, rear and twin projection screens, welded to measure in our in-house workshop. Custom designs on fabric create totally personalized concepts at events, venues, and stage performances. The latest technology in motion control, tracks for every weight of drape, stage accessories and reveal systems. Our branches around the world offer a wide range of skills to assist you at every stage of your project.The requested URL /forums/showthread.php?t=135683 was not found on this server.February 21st, 2013, In How To Sew, Nancy's Absolute Easiest Ways, Sew Handbags, Sewing, Sewing With Nancy, by Nancy Zieman Sewing piping in a seam adds great detail to handbags, accessories, and home dec projects. It’s a process that may look challenging, but as you might guess, it isn’t! Here are my favorite tips on how to sew piping. Cut 1-1/2″ wide bias strips if using 1/4″ seam allowances or 2″ wide bias strips if using 5/8″ seam allowances.Align right sides and overlap ends as shown allowing 1/4″ to extend at each side.
Stitch from V-shape to V-shape. Press the seam open . Use fusible piping, called Wrap ‘n Fuse; the cording is sandwiched within a strip of fusible web. Using fusible piping eliminates one stitching step! Fold the bias strip in half, wrong sides together and sandwich the cording in the fold of the fabric. Be sure that the fusible web on the piping is covered by fabric. Use the tip of an iron or Mini Iron to fuse the cording between the layers of fabric. If needed, trim the seam allowances to either 1/4″ or 5/8″. Align the cut edges of the piping along the edge of the fabric. Stitch using a zipper foot with the needle position along the left side of the foot, allowing you to stitch close to the cording. Or, use a Pearls N Piping Foot, the foot straddles the piping. It’s one of my favorite specialty presser feet. This time, the needle should be positioned to the right side, as featured. Keep the same foot on the machine with the needle at the same position.

Meet the fabrics right sides together. Stitch the seam, sewing along the same stitching line that was sewn to attach the piping. To join ends of the piping, allow for a 1″ extension of fabric beyond the cording at the starting point. Fold back the extended fabric. Begin stitching 2″–3″ from the starting point. When reaching the starting point, nest the end of the piping within the beginning point. Trim the cording pieces so that they “kiss.” Wrap the fabric around the ending point. All my favorite sewing tips are in one book The Absolute Easiest Way to Sew chapters include: For additional sewing insights and my favorite sewing techniques, check out my 3-part Sewing With Nancy online TV series, The Absolute Easiest Way to Sew. Content in this feed is © copyright 2013 by Nancy Zieman and may not be republished without written permission. You’re welcome to forward the email to a friend or colleague but it’s not okay to add the RSS feed automatically as content on a blog or other website.