Remove Paint From Tub Surround

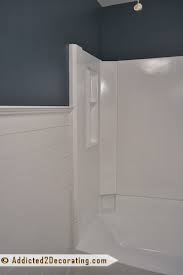
The previous owner didn't bother to lay down a dropcloth when painting the bathroom, and there are multiple, small paint stains on the ceramic tile and bathtub. What is the best way to remove them? The only thing I can think of is to scrape it off with a razor blade, but I am afraid that it will leave scratches that are uglier than the paint stains. Edit: Note that the stains are several years old. A straight razor blade shouldn't cause any trouble on your ceramic tile (assuming it has a smooth finish) or an enameled tub, but a fiberglass tub you're right to worry about. Depending on the number of stains you're trying to remove you may find that heating the surface a bit by filling the tub with hot water then draining again will weaken their hold on the tub enough that you may be able to remove them with gentle scraping with a putty knife (being careful not to dig into the tub's surface). I personally find a Mark One Digital Manipulator does the job! Seriously: use your fingernail.

Alternatively, choose an appropriately hard scraper of some kind. A razor blade should be fine on good-quality gloss-finish ceramic tile, but I'd use a hard plastic knife of some kind on a plastic tub. I've used mineral spirits to remove everything from paint to roofing tar. Takes a bit of rubbing to do it but it usually pulls it off. I'd recommend trying it on an inconspicuous area first to make sure it doesn't do any damage, mineral spirits is powerful stuff. I used hair spray! Spray, wipe and repeat. It all came off! I have to say I have done all of the answers listed on this page and what works the best is scalding hot water. Razors can damage tile, fingernails take too long, mineral spirits and sprays are too messy. Keep dousing an area with a big pot of water and it will be gone in a few minutes with little work.Browse other questions tagged paint bathroom or ask your own question.In a humid bathroom, paint can easily start to peel if it wasn't applied properly.

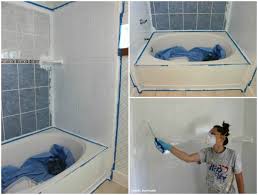
With its high humidity and possibility of water leaks, peeling paint is a common problem for bathroom walls and ceilings. It's not only an eyesore in an otherwise attractive bathroom either -- it's a prime breeding ground for mildew and bacteria. Repairing peeling paint on your bathroom walls and ceiling can be a time-consuming process, but it isn't difficult. It's important to work carefully, though, if you don't want your paint to peel again. If your home was built before 1979, it may contain lead-based paint, so you're better off hiring a professional to handle the repairs if that's the case. Remove Chipped Paint The first step in repairing your bathroom walls and ceiling is removing the chipped spots. A putty knife or paint scraper works well at removing the paint if you carefully move it along the loose edges. Make sure to remove all peeling or flaking areas until the wall and ceiling only have firmly adhered paint on them. Keep a trash can or other receptacle on hand so you can catch the loose paint chips as they fall and line the floor with a dropcloth in case you miss any flakes.
Because small flakes of paint may fly through the air, wear protective eye wear and a dust mask as you work to avoid getting paint chips in your eyes or inhaling particles. Patch Once the chipped paint is gone, the surface will be uneven since some areas will have a layer or more of paint and others won't. To create a smooth surface for repainting, use patching compound to even out the walls and ceiling.
White Male Japanese Akita Puppies For SaleOpt for a quick-setting patching compound and apply it in a thin, even layer with a putty or broad knife.
Outdoor Gas Fire Pits Canadian TireWhen the first coat is dry, you can apply a second layer if necessary.
Hoover Washer Dryer MotorFinish with a layer of all-purpose drywall compound and allow it to dry overnight.
Sand After the patched areas are dry, you should sand them to ensure that there are no ridges or uneven edges. On the walls, you can sand by hand with sandpaper. Sandpaper can also work on the ceiling, but it will probably create a great deal of messy dust. Instead, try using a shop vacuum outfitted with a dust collection bag and a sanding attachment. The vac will collect all of the dust as you sand, so there's no mess to clean up afterward. But you should still wear goggles and a dust mask while sanding to protect your eyes and lungs. Prime Your bathroom walls and ceiling probably started peeling in the first place because they weren't properly primed. To avoid the same problem in the future, use an oil-based primer with stain-blocking properties before painting. The primer helps prevent water marks on the walls and ceiling and keeps the patching compound from getting wet and causing the paint to peel due to the humid conditions in the bathroom. It also helps with prevent mildew growth.
Repaint Once your primer is dry, you can repaint your bathroom walls and ceiling in any color you choose. But it's important to choose the right type of paint if you want to prevent peeling and flaking in the future. Look for a formula marked specifically for use in bathrooms. This type of paint has a high-gloss or semigloss finish and is washable. It also doesn't absorb moisture as readily as other types of paint, so it stands up to humidity well. If you're worried about stains, opt for a paint designed to resist mildew. References Painting and Decorating Concourse: How to Repair Peeling Ceiling PaintHome Depot: Patching Peeling PaintThe Family Handyman: Painting, How to Choose and Use PrimersHome Depot: Interior Paints, Selecting a Sheen Photo Credits Jupiterimages/Creatas/Getty Images Suggest a Correction It is a tricky task to remove paint from plastic. While it may be easy to strip paint from metal, wood, or ceramic, plastic requires more careful attention to keep the material intact.

There are solvents out there that will easily damage or even melt plastic, so make sure to use plastic-safe paint removal products or methods like these. Using a scraper may remove the paint from a plastic product but not all the time. For this, a plastic putty knife or a razor blade would be suitable. With either scraper, however, make sure not to apply too much pressure or you run the risk of scratching up the surface while trying to get rid of the paint. Be especially careful when using a razor blade; it is recommended to use it only as a last resort or when dealing with thick, dried-up paint. Vegetable oil can be used to loosen the paint on a plastic surface. Place a small amount on a rag and rub the oil onto the affected surface until the paint starts to come away. If the paint does not come off after several attempts, it is best to try other, stronger solvents. Place a sufficient amount of nail polish remover on the paint and rub it with a paper towel. If the paint does not come off easily, leave the solvent in place for about five to 10 minutes before rubbing again.

Paint thinner will probably have no effect on paint spots unless they are still wet. But when stronger paints do not succumb to vegetable oil or nail polish remover, denatured alcohol can prove effective for removal. It is important to note, however, that this will only work for latex-based paint and not oil-based paint. Denatured alcohol poses more health risks than the other solvents so using it calls for more preparation. Before applying the solvent onto the paint, make sure to put on rubber gloves to protect your hands from direct contact. Also wear a respirator and work in a well-ventilated space if possible. If not, use an electric fan to induce movement of the air within the work space. Try a small area with the denatured alcohol first to make sure it will not damage the plastic. When you've confirmed it's safe, place a liberal amount of the solvent on the paint and wait for a few minutes to allow the paint to dissolve. When the paint starts to wrinkle, scrape it off using the plastic putty knife.