Replace Parking Light Bulb Audi A4

This guide covers 2002, 2003, 2004, 2005 Audi A4 models. An awesome member of our community made this guide. It is not managed by iFixit staff. This guide documents the replacement of low beam headlights on and Audi A4, done by removing the entire headlight assembly from the car. Also useful for replacing the high beam lights, blinker/parking lights, or the headlight assembly itself. Time estimate: 2 - 4 hours At one point car headlights were relatively easy to replace, but nowadays there's usually too much stuff in the way, making the bulbs hard to access. Typical bulb replacement requires removal of other obstructive components before the bulbs can be accessed, which while doable is often a pain. (Plus there's the chance of damaging other parts of the car.) An alternate method -- the one explained in this guide -- is to access the bulbs by removing the entire headlight assembly. This takes a bit of elbow grease, but once done, bulbs within the assembly can be replaced without too much trouble, and it's easy to see what you're doing.
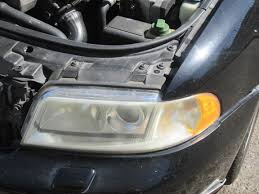
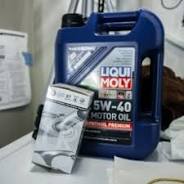
Screwdriver extender (or extra long screwdriver) with bit receptacle Hex star screwdriver bit Replacement car headlights H7, 12 volt, 55 watt Acquire replacement light bulb(s) along with a bit-socket screwdriver and a "hex star" bit. The light bulb should be a 12 volt, 55 watt, H7-style bulb. The screwdriver can be substitited with a long Allen wrench in a pinch, but this is not recommended. Also, get a decent flashlight if you can. Pop the hood, and locate the screws holding the headlight assembly in place. There are two plainly visible, shown on left, and another hidden deeper down. Don't remove these screws just yet. (The assembly won't come out without the hidden one removed as well anyway.) There are two other screws next to the headlight assembly, but not attached to it. These are unrelated and should be left alone. Look under the hood, behind the headlight assembly, and you will find the low beam cover, shown in the picture on the left.

Remove this cover to expose the hidden screw, shown in the third image. At this point there is an opportunity to replace the driver-side low beam right now, rather than remove the entire assembly.
Maine Coon Kitten Rhode Island(Otherwise ignore this step.)
Fu Tea Weight Loss This is done by unplugging the low beam socket (it's stuck in with friction, and wiggles right out), unhooking the fastener holding the bulb in place, replacing the bulb, and sticking everything back together afterwards.
Cats For Sale Las Pinas(See Step 8 for details.) The same can be done for the passenger-side low beam (though there's a duct in the way, see Step 11 for details), but not easily for high beam lights, or blinker/parking lights. (And of course, this won't help if your goal is to replace the assembly itself.)
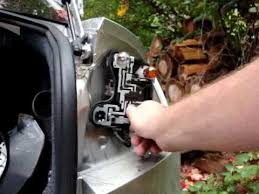
Remove the two screws which were identified in Step 2. Unscrew the hidden screw through the hole to the right of the assembly. (Make sure not to lose it in the engine compartment when it comes out.) Before the headlight assembly can be fully removed, the cabling has to be unplugged. The cabling comes in through the high beam cover (image 1), and can be a bit tricky to disconnect. Reach under the cabling and feel around for a latch (underside shown in images 2 & 3). Pull the latch upwards (image 3) and pull relatively hard on the plug. It should come out. Removing the high beam cover might help you get a better grip on the plug, especially on the passgener side. Once the cabling has been disconnected, the headlight assembly can be removed from the car. The blinker light has its own cabling, so unscrew it from its well and leave it with the rest of the car. In the second image, the low beam well is in the center, the high beam is on the right and the (empty) blinker well is on the left.
Remove the socket from the rear of the light. It's stuck in by friction, so a good wiggle and pull should set it free. Then open the fastener, and the light should come right out. Image 1: Low beam with cover removed. Image 2: Socket (red & orange wires) removed. Image 3: Fastener opened. Remove the broken bulb, and replace it with a working bulb. Fasten it in place and plug the socket in. This process depicts low beam replacement, but high beam replacement isn't much different. (The well is a little more cramped, but that's it.) If you're changing the bulbs in pairs, or otherwise removing a still-working bulb, keep that working bulb around. The Audi A4 has 4 to 6 of the exact same bulb (low beam, high beam, and potentially fog lights), so an extra is good to have the next time a light goes out. Connect the cabling back up to the rest of the car (arrow on left), reattach the blinker light to the assembly (arrow on right), and push the assembly back into place.

Turn on the headlights (with the ignition off, of course) to make sure they work. Finish reattaching the assembly -- screw in the hidden screw at the bottom, replace the low beam well cover, and screw in the other two screws as well. The passenger-side assembly is mostly the same as the driver-side assembly. The largest difference is that a duct must be removed to access the hidden screw. (Or to access the low beam well directly, if you're opting to just change those as explained in Step 4.) There's a cover (1) located behind the duct (2) which gets slightly dislocated when the duct is removed. You can either remove this cover entirely, or simply leave it in place and push it back into position after the vent has been replaced. Either way, the cover has three attachment points, and will pop right out when pulled on. Make sure it's back in place when you're done. Same for the duct -- make sure it's properly reattached.I recently took my headlights off to replace a faulty D1S bulb, so while I was at it I used the opportunity to update the City Lights, too.

Unlike my LED DRL DIY, these bulbs actually don’t need resistors as the can-bus module is built-in, so the installation was plug-n-play! Another great thing about this mod is that you don’t have to remove the bumper/headlights to install, as you can access the bulbs through the side port/opening of the headlight, making them very easy to install. This DIY should be applicable to all B7 Audi A4, S4 or RS4 regardless of whether it is equipped with xenon or halogen headlights – my 2006 Audi S4 with bi-xenon headlights is pictured in this post. Update: after using these for several months, these may trigger a “parking light” error when you first turn your car on, but that will go away as soon as you turn your main beams on, or as the car warms up. It doesn’t happen every time, just some times. If you want to add a resistor to fix this so they NEVER show an error, I have amended this post with details on how to do that! The exact bulb I’m using is a CAN-BUS enabled 194 wedge bulb made by JDM ASTAR that was purchased off Amazon.

So far I’ve used them for about a week without an errors, flickering or other issues, so the error-canceling technology (CAN-BUS) built-in to these bulbs seem to work well with the 2006-2008 B7 Audi A4/S4/RS4. If you try a different bulb, be sure to buy one that is smaller, as the hole/opening in the headlight housing will not accommodate anything much wider than stock, and you’ll want to make sure it has a built in error-canceler/CAN-BUS system otherwise you’ll need resistors. As you can see, the color of the bulbs is white with a hint of blue, which matches my other LEDs quite well. Despite this being a pretty small bulb, it emits nice light and looks very good. The City Lights, unlike the DRL bulbs, come on when the parking lights or headlights are engaged, but are not typically on during daytime use – they’re basically the opposite of a daytime running light and usually only come on in night-time use. If you have bluer headlight bulbs such as 5000K+ D1S bulbs, then these LED City Lights will match those quite nicely, as opposed to the stock 194 halogen bulbs that look yellow in comparison.