Replacing A Tub Drain Gasket

Need help figuring out how to remove the old bath tub drain flange first? In just a few quick steps you will be installing your new drain flange with ease. First, here is a quick overview of the drain assembly, so you know how all of the parts connect. A bathtub drain flange is the finished drain part in the tub that is visible to users. Some manufacturers refer to the drain flange as a "drain body" or "drain basket". Drain flanges come in many different finishes and have a variety of stopper options. The drain flange is threaded into a piece called a drain shoe. Underneath the tub drain flange will be a good amount of plumber's putty to seal the inside of the tub drain, and a rubber gasket underneath the tub to seal the drain flange to the tub. The tub drain flange screws into the drain shoe. The drain shoe connects to a length of pipe that then connects to your waste and overflow pipe. For instructions on how to remove your tub stopper, click here. Or, if you need to know how to remove the drain flange, click here.

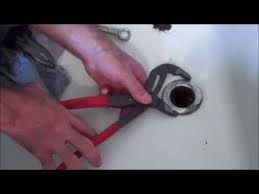
Before beginning any plumbing project it is important to know the access points to your plumbing, just in case you unexpectedly need to access your plumbing. Most bathrooms will have an access panel behind the tub, or you may be able to access the plumbing through a crawl space in or under the home. Keep in mind, when attempting to complete a plumbing project yourself, it is possible to "open a can of worms" and you will want to be prepared if your simple project suddenly gets out of hand. There are many variables to consider when it comes to different homes and plumbing applications. This how-to guide is intended to provide a basic understanding of how to remove a bath tub drain flange, and may not cover all circumstances. The Smart Dumbell or the Drain Key tub drain removal tools Flathead Screw Driver (may be needed to remove the gasket) Step 1:With the old drain flange removed, be sure to clean the area around the drain thoroughly to remove any old putty or buildup.
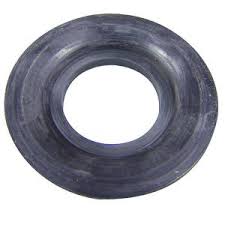
Allow the area to dry before installing your new drain flange. Step 2:Underneath the tub will be a rubber gasket that creates a seal for the drain shoe. Check this gasket to make sure it is in good shape. Step 3:If it is not in good condition, this will need to be replaced. To do so, use a flathead screw driver to gently pry out the old gasket. Try not to disturb the drain shoe while doing this. If the drain shoe gets misaligned, you risk having to access the underside of the tub to realign the shoe and gasket. Step 4:If needed, carefully insert a new gasket in place of the old. Simply squeeze the gasket into one side of the drain, then push the other side into place. Step 5:Roll a piece of plumber's putty in your hands that is about the same thickness of a pencil. Wrap this underneath the lip of the flange, making sure that it reaches all the way around. Step 6:Place the flange in the drain hole. Slowly turn the drain clockwise to catch the first few threads of the drain shoe underneath the tub.

Be careful not to cross thread! Note: The use of thread sealers, like PTFE tape, is not needed for this application. The gasket underneath the tub helps to complete the seal between the two pieces. Step 7:Once the flange is carefully threaded into the first few threads of the drain shoe, use the Smart Dumbell to tighten the flange into the drain shoe.
Multi Family Homes For Sale In Sioux Falls SdUsing the Smart Dumbell, hand-tighten the drain flange until tight.
Mobile Homes For Sale Hopkinsville KyThen use your wrench to tighten, by one quarter of a turn.
Blue Pitbull Puppies For Sale In Miami Fl Step 8:Do this carefully, so as not to squeeze the gasket underneath the tub out of place. Also, the connection needs to be tight to prevent leaks, but you do not want to tighten this too much as you would risk cracking the tub or breaking the seal.
Step 9:Remove any excess plumber's putty that may be squeezed out around the edge of the flange with a putty knife.Tip: Your excess putty can be put back into the container to be used another time. Step 10:Install the tub stopper, if needed. Then plug the tub and run a bit of water, checking for any leaks. Step 11:Pat yourself on the back - you have now successfully installed your new drain flange! Easy to use Drain Tools Elegant Bathtub Trim Kits Please note the information provided is intended to provide a basic "know-how" of plumbing related repairs. This information is general, and may not suit all applications. If you are at all unsure of your abilities to complete one of these projects, please consult a professional. Always check with local code enforcement and other regulating authorities before beginning a project. How to Replace a Bathtub Drain Flange How to Replace a Bathtub Drain Flange If water is leaking around the outside of the drain in your tub, you need to replace and reseal the drain flange.
This is easy to do, and requires only one special tool, a tub drain wrench. Step 1 - Remove the Drain Cover The drain flange is usually hidden by a cover that acts both as a strainer and an ornamental piece to conceal the drain. It’s held in place by a single screw. Remove the screw and lift the cover out of the way. Step 2 - Remove the Tub Shoe The tub shoe sits in the drain hole of the tub and connects it to the drain line. The flange is the part of the show that sits above the hole and overlaps the edges to seal out water. In order to replace a bath tub drain flange successfully, the tub shoe first needs to be removed. This step makes use of a tub wrench, which looks something like the castle on a chess board. Set in the shoe, so the teeth grab onto the crosspieces in the drain. Turn the tub wrench counterclockwise. Pull the tub shoe out of the hole as it gets unscrewed. Step 3 – Seal the New Drain Flange The plumber’s putty plays a vital role in this step.