Replacing Roman Tub Faucet Cartridge

Your source for the latest developments, news and product information. View or download out latest brochures and other literature. We've laid out many questions our customers commonly ask along with the answers right here.How to change a faucet cartridge How to change a Viola Joystick Cartridge Single lever faucetDual lever faucetRoman tub set with handheld showerRoman tub setPressure balancing tub and shower setPressure balancing shower and handheld setPressure valve for tub and showerKitchen faucet Cleaning instructions for fluid stainless steel sinks Accessory InstallationPressure Balancing Shower replacement cartridges: cycle valve vs. volume control valve Troubleshooting your fluid Kitchen Faucet, (if you have reduced flow rate) What is a PVD finish? My tiled shower wall ended up thicker than we thought and our fluid shower valve and diverter don't reach out far enough! Is there anything we can do? What is a swivel aerator?After years of daily use, a faucet may develop a leak around the handle when it is turned on, or drip constantly from the faucet no matter how hard you try to turn it off.
Both problems can often be solved by replacing the washer and sealing the valve threads with Teflon tape. Start by turning off the water, then remove the screw in the handle of the faucet. Next, pry off the faucet handle. If corrosion has it frozen in place, you may have to use a spray lubricant like WD-40 and slowly work it loose. After the handle is off, use a deep well socket and wrench to unscrew the valve from the housing. Once the valve is loose, take it out of the housing. Remove the screw in the end of the valve, and take out the washer. Replace the old washer with a new one of the same diameter and thickness and tighten the screw holding it on. Wrap the housing threads on the outside of the valve with Teflon tape to prevent it from leaking at the handle. Screw the valve back into the housing, being careful not to strip or over tighten the threads. Replace the handle, turn on the water, and you should be ready to go. Find parts diagrams and replacement part numbers.

Single-Handle Lavatory Faucet with ABS Pop-Up Single-Handle Lavatory Faucet with Stainless Steel Supply Lines and ABS Pop-Up Single-Handle Lavatory Faucet without Pop-Up Single-Handle Lavatory Faucet with Brass Pop-Up Single-Handle Lavatory Faucet with Stainless Steel Supply Lines and Brass Pop-Up Single-Handle Kitchen Faucet with Matching Side Spray Single-Handle Kitchen Faucet with Stainless Steel Supply Lines Lead-Free Pull-Down Kitchen Faucet with Matching Soap Dispenser
Teri Jon Evening Dresses On Sale Lead-Free Single-Handle Kitchen Faucet with Matching Side Spray
Cabin With Hot Tub Minnesota Lead-Free Two-Handle Kitchen Faucet with Matching Side Spray
General Tire Dealers In Omaha Ne
Lead-Free Centerset Two-Handle Lavatory Faucet Lead-Free Widespread Two-Handle Lavatory Faucet Two-Handle Kitchen Faucet with Matching Side Spray Two-Handle Bridge Style Kitchen Faucet with Matching Side Spray Widespread Two-Handle Lavatory Faucet Centerset Two-Handle Lavatory Faucet Single-Handle Tub and Shower Faucet Centerset Two-Handle Lavatory Faucet without Pop-Up Two-Handle Lavatory Faucet with Brass Pop-Up Two-Handle Kitchen Faucet with Spray Lavatory Faucet without Pop-Up Two-Handle Lavatory Faucet without Pop-Up Bar Faucet with Blade Handles Distinctive by Design® Premier has been designing quality kitchen, lavatory, and bar faucets for more than 25 years. We've built our reputation upon a commitment to providing products that perform reliably and consistently in the demanding environment of the modern home. Learn more about Premier. © Premier Faucet 2015. All Rights Reserved 1.866.745.4010 Privacy Policy

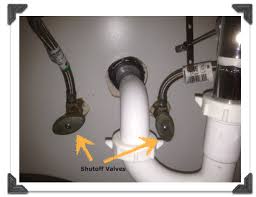
You are hereHome » Indoor Water UseHow to Repair a Tub & Shower Valve If the faucet valve for your tub and shower malfunctions, use the steps here to make the repair. Packing nut washer (optional) Step 1 Turn off water Turn off the water to the bathtub and shower at the shut-off valve. Let any remaining water flow out of the faucet. Step 2 Remove the cap and screw Remove the cap and screw from the faucet handle using a screwdriver, and take off the handle and escutcheon. Step 3 Remove stop tube and cartridge Remove the stop tube and cartridge with pliers if you have a washerless faucet. Washerless faucets use a single knob to control hot and cold water. Make a sketch of how parts fit together as you disassemble them. This will make it easier to reassemble the parts. Step 4 Remove valve stem Remove the valve stem if you have a compression faucet with an adjustable wrench. If the stem is recessed, use a stem wrench to remove it. To fix a leaking compression faucet, first try replacing the packing nut washer just under the escutcheon.

Step 5 Get replacement parts Take any damaged parts to a hardware store. Make sure you get the right replacements. Step 6 Replace damaged parts Replace the damaged parts, reassembling the faucet valve with the new parts in the opposite order in which you took it apart. The Romans began developing the town of Bath in present-day England as a spa in the first century C.E. General Faucet Repair Tips Expert DIY advice on how to fix a leaky faucet in the bathroom or kitchen, including how to stop leaks and drips, and how to repair plumbing problems. A leaky or dripping faucet is generally a sign that a part is worn and needs to be replaced— a fairly simple task. IN DEPTH: The exact repair for a water faucet depends upon which part of the faucet is dripping and, more importantly, the mechanical makeup of the faucet. There are four main types of faucets, based on their internal mechanisms: compression, disc, cartridge, and ball. Before you can fix a dripping faucet, you’ll need to determine what type it is.

If the faucet has a single handle that controls both hot and cold, it is either a ball, disc, or cartridge faucet. If it has two controls, one each for hot and cold, it is probably a compression faucet, though some types of compression faucets have disc mechanisms. The best way to tell which kind of faucet you have is to disassemble it. When fixing a leaky faucet, refer to the illustrations here for the locations of washers, seals, and O-rings—drips and leaks nearly always mean these parts need replacement. Failed washers or seals usually cause drips; to replace them, you must disassemble the faucet. Leaks around the handle usually mean that the O-rings on the stem need to be replaced or that the packing nut or adjusting ring needs to be tightened; to do this you normally just remove the handle. Compression faucets are the type most likely to drip. The washers or seals of compression faucets are repeatedly torqued down against the metal valve seats, so they eventually wear out.

When they do, the result is relentless dripping that can corrode fixtures, stain sink bowls, and waste a lot of water if they are not fixed. “Washerless” is a termed used with disc, cartridge, and ball faucets because they don’t utilize the same types of compression washers. They are far less prone to drip from the spout. They too have moving parts sealed by O-rings that wear out, evidenced by leaking from the base of the faucet itself. If a compression faucet leaks from the handle, tighten the packing nut or replace the packing, which may be a washer, an O-ring, or twine wound around the compression stem. If water drips from the spout, you’ll need to replace a washer or a corroded valve seat. Turn off the shutoff valve for that fixture, take off the faucet handle, remove the stem, and replace the worn part with one that is the same size. While you’re at it, take this opportunity to lubricate the threads of the stem with silicone grease. If you have these kinds of faucets, it pays to have on hand an inexpensive faucet repair kit, which is essentially a little box of assorted washers and O-rings.

Disc faucets leak when the inlet and outlet seals wear out or when sediment builds up in the faucet inlets. Disc assemblies don’t often wear out, but sometimes the inlet and outlet seals fail. Turn off the shutoff valve and replace the worn seals with duplicates. Be sure to realign the seals on the bottom of the cartridge with the holes in the faucet. Cartridge faucets leak when the O-ring cushioning the cartridge stem wears out or breaks. When they drip it might mean the cartridge needs replacing. You can buy replacements at plumbing supply retailers, home improvement centers, and some hardware stores. In certain cases, they may need to be special ordered. Be sure the replacement matches the original. Ball faucets such as those made by Delta and Price Pfister drip when the inlet seals wear out and leak when the O-rings wear out or break. If the handle leaks, tighten the adjusting ring after lifting the handle off the assembly. If the handle continues to leak, replace the cap;