Telescope Mirror Blank Kits
Books On Telescope & Mirror Fabrication 4 -1/4" FINISHED MIRROR KIT 4 -1/4" PLATE EDUCATIONAL KIT 4 -1/4" PYREX EDUCATIONAL KIT 6" PLATE EDUCATIONAL KIT -A 6" PYREX EDUCATIONAL KIT -B 6" PYREX EDUCATIONAL KIT -C 8" PLATE EDUCATIONAL KIT -A 8" PYREX EDUCATIONAL KIT -B 8" PYREX EDUCATIONAL KIT -C 10" PLATE EDUCATIONAL KIT -A 10" PYREX EDUCATIONAL KIT -B 10" PYREX EDUCATIONAL KIT -C 4 -1/4" PLATE GLASS KIT 6" PLATE GLASS KIT 8" PLATE GLASS KIT 10" PLATE GLASS KIT 12.50" PLATE GLASS KIT 14.50" PYREX® LIGHT WEIGHT KIT 14.50" PYREX® GEN KIT 16" PYREX® LIGHT WEIGHT KIT 16" PYREX® GEN KIT 18" PYREX® LIGHT WEIGHT KIT 18" PYREX® GEN KIT * SUBJECT TO MATERIAL AVAILABILITY CEMENTED F/10 & F/14.1 4.10 ACHROMAT KIT-NO TOOL 6.10 ACHROMAT KIT-NO TOOL 8.10 ACHROMAT KIT-NO TOOL 4.14 ACHROMAT KIT-NO TOOL 6.14 ACHROMAT KIT-NO TOOL 8.14 ACHROMAT KIT-NO TOOL

4.15 ACHROMAT KIT-NO TOOL 6.15 ACHROMAT KIT-NO TOOL 8.15 ACHROMAT KIT-NO TOOL Plate glass blanks are used by many of the commercial telescope manufactures in theirThese scopes have received high rating in reviews that appear in nationalThe major difference between a Pyrex® blank and a plate glass blank is the expansion coefficient of material when they are exposed to temperature variations. The Pyrex® is more stable in this situation while plate glass requires more time to normalize to the temperature changes. However, once the plate glass has normalized (adjusted to the surrounding temperature), the images would be the same if both the Pyrex® and plate glass blanks have an equivalent polish curve. The only other time Pyrex® blanks may be preferred is if the person polishing the mirror is attempting to approach perfection/a precision surface which requires a stable blank to reduce the amount of hand work that has to be done to correct the curve.

Usually, these individuals have had experience before and have access to testing equipment to check their progress as they work on their blanks. For most amateur telescope makers it becomes an issue of personal preference as to which of the two materials to use as a mirror substrate. attempt and for general observation, either material should be adequate to make a FOR MORE INFORMATION PLEASE CONTACT US: Newport Glass Works, LTD. Fax: (714)484-7600 or (714)484-8181 Copyright Newport Glass Works, LTD. 2012 All Rights ReservedThis page will describe the necessary materials and tools you will need to make a mirror. will only list what we feel are the minimum equipment required; additional, optional equipment is described on other pages in this series, under the topic to which it applies. As always, we describe the most common and accepted tools and materials - items that we feel will give the novice the greatest chance of success, and without

Please consult our list of ATM Suppliers for ideas about where to purchase these items. Topics on this page: Mirror Blanks, Grinding & Polishing Tools, Grits & Pitch, Storage
Pumpkin Toilet Paper Holder Containers, Grinding Stands, and Miscellaneous
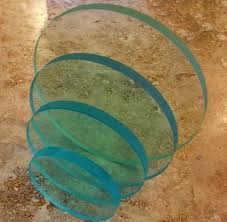
Kohler Shower Mixer Valve Parts 6" & 8" Pyrex Mirror Blanks
How Much Does Mesquite Flooring Cost This is the focus of all your work - you will turn this flat piece of glass into an accurateWe recommend a full thickness Pyrex blank for mirrors up to to 12" in size. Full-thickness means the diameter to thickness ratio is 6:1 (i.e. an 8" full thickness mirror is 1.3" thick). Any mirror that is less than 6:1 thick is referred to as a thin mirror.

Thin mirrors cost slightly less, weigh less, and cool down quicker. But they are much more susceptible to problems with ground in astigmatism and distortion due to support in the telescope unless additional precautions are taken. For your first mirror, it's just not worth the trouble or risk - buy a full-thickness blank. We recommend Pyrex over plate glass. Today, the cost difference is minimal, and Pyrex has two advantages: Many fine mirrors have been made from plate glass, so if that is all you can obtain, don't be discouraged. But if you have a choice, we recommend Pyrex. Tile Tool & Pitch Lap You will need two tools: A hard tool for rough and fine grinding, and a soft tool, or pitch lap, for polishing and figuring. Traditionally, the pitch lap was made on top of the grinding tool. using plaster disks for tool substrates, and that you use separate disks for these two tools. Grinding Tool: We recommend using a plaster and tile tool for grinding: The are inexpensive and easy

to make, and they work really fast. See How to Make a Tile Tool. Traditionally, a glass tool was used, but these are more expensive, and work slower. If you make or buy a grooved glass tool, you will gain some of the speed advantage of a tile tool. Pitch Lap: We recommend making your pitch lap on a separate plaster disk that has been molded to the curve of your partially ground mirror. See Pouring a Pitch Lap. If you choose to follow tradition and pour it on your grinding tool, you eliminate the possibility of returning to fine grinding should you get a bad scratch or other problem as you no longer have a tool that mates with Grit & Polish Display (Click image to Enlarge) Grits and Polishing Compound are the consumables in the mirror making process. Grits, typically of Silicon Carbide or Aluminum Oxide, in various grades, are used as an abrasive between the mirror and tool to grind the glass. Pitch is used to make a soft, conforming pitch lap for polishing and figuring.

It is used with a Polishing Compound such as Cerium Oxide, which is actually a very fine, smooth abrasive. See our page on Grit, Pitch and Polish for quantities and sizes Lap Stored in a Food Container Your mirror and pitch lap are both fragile and need to be protected when not being worked on. Your lap needs to be stored in a container that will not rest on the lap's surface (and deform it). Some people wrap their mirror in a clean cloth or towel, and store it in box. For the lap, you can use a zip-closure food storage bag, inflated with air so that the bag does not rest on the lap's surface. The most popular storage solution today are round plastic food storage containers, which come is sizes just right for 6", 8" and 12" mirrors. If your grit came in bags, you may also want some sort of hard sided container to store it in while you work. You will need something that seals well, as you do not want your grit to get contaminated. bottles or plastic food storage containers work well here;

a plastic spoon can be used sprinkle grit on you When storing grit, we always use a plastic bag in addition to the stiff container. surprised at how many grit particles are caught by this bag! Only have one grit container open at a time, all the others should be away from your work and securely stored. Picnic style plastic salt and pepper shakers that seal up are handy for course grits; they can be sprinkled on the mirror directly. Finer grits and polishing compounds are often pre-mixed with water in a suspension; here plastic squeeze bottles (also squeezed-style mustard containers) can be used effectively. Grinding on a Barrel You have a lot of choices here, try to find something that fits in your workspace and is comfortable for Traditionally, mirror makers used a wooden barrel, and phrases like "Walk around the Barrel" are still in common use by ATM's. But few use wooden barrels anymore. Steel or Plastic 55 gallon drums are the current best

approximation: a plywood work surface is fastened to the top and the barrel can be partially filled with water to give it ballast. Turntable Clamped to Counter If you can't get hold of a barrel, you can build an approximation of one. A square wooden grinding stand or a wooden disk attached to a vertical pipe sunk in a bucket of concrete - there are endless possibilities. Your grinding stand should be about waist high, and it needs to be stable, as you will be vigorously pushing it from all directions. Grinding on a Bench with Turntable If you can't fit a stand, build a simple turntable out of plywood. You can clamp this to a kitchen counter, or a bench or table. You do not need a fancy pivot; a screw sunk in the base and a blind hole in the turntable is more than adequate. You do not want your turntable to spin freely, so a little friction is good. In general, given a choice, most people find it easier to "walk around the barrel", so you might consider

one of the freestanding stands first. But many, many mirrors have been successfully made on turntables - which we use at the Stellafane mirror courses due to lack of sufficient space. You need a way to hold your mirror or tool. Three cleats or two cleats and wedge are the traditional method. Recently becoming popular is to use a disk of non-skid mat, sold as draw liners in supermarket or discount stores, or as router work holders in home centers. These have a checkerboard patter of rubber bumps and holes, and grip The ASGH "Wooden Barrel" Dick Parker created the "Wooden Barrel" shown here for the Astronomical Society of Greater Hartford's mirror class, which he leads. This is easy to make and very solid. Dimensions are not critical and you can adjust to suit your situation. The top and bottom are 3/4-inch plywood disks about 24-inches in diameter. Attached to each of these disks are cleats made from 2x4's about 6" long with angles faces to accommodate the struts (see detail below).

Eight 1x2 struts are then connected between these cleats in the diagonal pattern shown to form the "barrel". Make the struts long enough to bring the work surface to just below your waist (36-inches is a work typical height). Dick says it is critical to both glue and screw every joint. I recommend you use 1-5/8" sheetrock screws and a good quality carpenters glue. I would screw together the barrel for a trail fit to get the height right before I did final assembly with glue. You need to add ballast to the bottom, and as you can see, Dick uses six 8x16 patio blocks to provideA 5 gallon bucket of sand would also work, but you would have to put the bucket inside before you finish assembly. Finally, seal the top surface with paint or urethane to make cleanup between grits easier. the wooden wedge at bottom left to prevent rocking on an uneven floor. Plastic Water Bucket for dunking your mirror and tool to clean off spent grit. and won't chip your mirror.

Do not wash grit down a sink - it will harden in your pipes and you will have to call the plumber. Spray Bottle to spray water on your grit when you grind. Sharpening Stone to bevel your mirror with. This is a carborundum stone, used to sharpen knives, available in hardware stores. This stone is made of Silicon Carbide grit, it just happens to be glued into a solid, unlike the loose Silicon Carbide grit you will use to grind your mirror. Metal Ruler & Feeler Gauge so that your can measure your depth of curve, or sagitta. How to Measure Sagitta for more information and alternative Magnifier or Eye Loupe to inspect pits so you know when to proceed to the next grit. a telescope eyepiece of 20mm or longer focal length, you can use this backwards (look into the part that goes into the focuser) instead. A Laser Pointer has several uses in mirror making: Inspecting the mirror surface for complete polish Gross alignment of a Foucault Tester