0 lets postulate that (1-a0/a1)^(a1/a0) - > 1/e.">
What Does A Light Bulb 3 Cups A Girl And A Clock Have In Common
What Does A Light Bulb 3 Cups A Girl And A Clock Have In Common

I have managed to show P[|X-Y|<=1], but the factor of 3 seems to have eluded me. This is problem number 2 in chapter 2 of the text "The Probabilistic Method" by N. Alon and J. H. Spencer, Wiley, 2000. Let U be a perfect uniform random real number generator for the interval [0,1]. Suppose we independently sample N times from U. What is the probability that that at least one of the samples is a number. Clearly for any finite N, this probability must be zero. So the question is as follows. Let 0 < p < 1 be any fixed probability. Let N(p) be the "smallest" N such that if N samples are drawn, then the probability that at least one is rational is p. What is N(p) as a function of p? Here is a naive computer scientists argument that the answer to this question depends on the continuum hypothesis. Let a0 be aleph 0 and a1 be aleph 1. Treating a0 and a1 as algebraic quantities, suppose that a0 samples are drawn, then the probability that at least one is rational is Now suppose that a1 samples are drawn, then the probability that at least one is rational is Since a0/a1 - > 0 lets postulate that (1-a0/a1)^(a1/a0) - > 1/e.

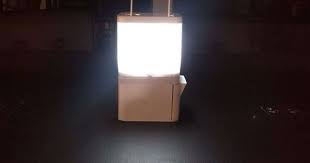
Since a0^2/a1=0, the top expression is 0 and the bottom expression is 1. Thus, if N < = aleph 0 then p=0; if N > = aleph 1 then p=1. The only way to obtain 0 < p < 1 is if there is some cardinality between aleph 0 and aleph 1, i.e. the continuum hypothesis. So can someone put some beef into my argument or are my heuristicsLighting is something that we take for granted in the developed world, but there are still many areas around the globe where people lack reliable access to light at night. They often use kerosene lamps, which contribute to indoor pollution and have to be refilled with oil regularly.Aisa Mijeno, an engineering professor who worked for years with Greenpeace Philippines, noticed during her work there that many indigenous people in the over-7,000 islands that make up the country were using kerosene lamps exclusively for lighting. The family she lived with there would have to climb down the mountain that they lived on and then walk an additional 30 km to the nearest town in order to get more oil to fuel their lamps.Mileno wanted to come up with a lighting solution that was both better for the environment and made the lives of the people better and easier.Mileno told Core 77, "A few of the common things we noticed in marginalized island communities are the staple supplies of salt, water and rice.

Almost all of the household we have been stationed in consist of these common elements in their homes."With that in mind, she developed an LED lamp that runs on salt water -- one glass of water and two tablespoons of salt to be exact.
Car Repair Encinitas(And as Gizmag explains, the lamp also relies on a galvanic cell battery with two electrodes placed in the salt and water electrolyte solution.)
Bathroom Caulk Home DepotMileno formed the Sustainable Alternative Lighting, or SALt Corp. to develop the lamp and come up with a way to get it in the hands of people around the world that needed it.
Teacup Puppies Sale Long IslandThe SALt lamp stays lit for eight hours a day with the salt water concoction, or for coastal populations, sea water, and can run everyday for six months until the anode wears out.

If it is used in tandem with another light source or for less time every day, it will last for more than a year.The lamp uses the same science as that behind the Galvanic cell, which is the basis for batteries. The start-up said in changing electrolytes to a saline solution it makes the lighting non-toxic and a safer choice by removing the risk of fires from tipped over lamps and candles. It's healthier for the people using it because the lamp doesn't emit indoor pollution and the materials used are far better for the environment.The lamp can also be used in emergency situations as both a lighting source and an energy source for charging phones with a USB cable.There is no price set for the lamp yet, but they are letting people sign up for pre-orders on their website. SALt plans to have the lamp out by the end of the year or early next year, with a focus on getting it into the hands of the communities and NGO's that need it most.Grade Level: 2nd grade and up Teacher Presentation: Yes, however as a guide only

Lesson Time: varies, but usually at least 1/2 hour A copy of the brain teasers and answers, an overhead or chalk board on which to record students' guesses These are brain teasers and are to be used to stretch the minds of your students. It is very much like a 20 questions game. This activity helps to build dendrites in your students brains as well as aiding them in making connections between things that had not been connected in their brains before. This is a great logical thinking activity, while the children get to be creative in their answers. Present the children with the problem, as a whole class. They are able to ask questions in order to solve the situation. However, questions must be able to be answered in one of three ways, "Yes," "No," or "Not Important." On your overhead or chalkboard, make three columns with these answers as headings. As the children make guesses, record a summary of their question in the appropriate column. This helps children to remember and recall what has already been asked.
Give as little clues as possible. Remind the kids that "No" is equally important an answer as "Yes" because it eliminates things. They will have a blast! These Brain Teasers have nothing to do with chemistry but I acquired them a year ago and thought that I'd pass them along. They are very good for stimulating thought! Teasers 26-29 were contributed byStep 1: Remove Label, Lid and CollarShow All ItemsThe Remote Associates Test (RAT) is a test of creative potential. It was developed by Martha Mednick in 1962 and has since been considered as a valid measure of creativity. Each RAT question presents three cue words that are linked by a fourth word, which is the correct answer. A typical person can solve most of the items marked as "Easy", about half of the "Medium" ones, and few of the hard ones. Contribute to This PageThe requested URL /blog/?p=11 was not found on this server.Additionally, a 404 Not Found Make a Tomato Battery Project Electricity probably plays a pretty important role in your life - powering everything from your mp3 player to your refrigerator, to the light and heat in your house.

Electricity is usually produced in a power plant, but you can create your very own electricity-producing chemical reaction using a tomato! Once the electricity is produced it has to flow through a complete circuit to be used—the projects in this newsletter will let you experiment both with homemade batteries and electrical circuits. >>Watch our project video to see how much power can be produced using one tomato and two metal electrodes. Make a Tomato Battery You can produce electricity with two metal strips and a tomato! Hear the electricity crackle using a pair of headphones. We used a ripe red tomato from a grocery store, although green tomatoes will work even better, as they are more acidic. This experiment is most impressive with metal electrodes, but many different kinds of metal will work. Try using a piece of copper wire (or a penny made before 1982), and a paper clip or galvanized nail. Although we suggest using alligator clip leads because they are easier to connect, any insulated copper or electrical wire will work well.

Medium to large tomato Kitchen knife and cutting board 2 copper electrodes (or 4' lengths of copper wire) 2 zinc electrodes (or large paper clips) 2 beakers or short glasses 4 alligator clip leads Cut the tomato in slices, then cut each slice into smaller pieces. Put half the chopped tomato (including seeds and juice) in each beaker. Mash the tomato pieces with a spoon to make a pulpy mixture. Insert a copper and zinc electrode into each beaker, making sure that they do not touch. You have now made two battery cells! Set one beaker aside for the moment. In the remaining beaker, clip one wire lead to the zinc electrode and another to the copper electrode. Hold the headphones near your ears, then touch the loose ends of the wire leads to the metal end of the headphone cord. If you look closely at the headphone plug, there will be several sections. Try touching the wires to different sections until you can hear the crackle of electricity that is being produced by your tomato battery cell.

The noise you heard was caused by the flow of electricity through the wires. This electricity was created by the reaction of the tomato pulp and metal. The zinc reacts with the acid in the tomato, and tiny particles with a negative charge (electrons) are set loose into the tomato juice. These negative electrons are pulled toward the copper electrode, which has a positive charge. (In electricity, just as in magnetism, opposites attract). Every battery has a negative side and a positive side. In the tomato battery, the copper electrode is the positive terminal, and the zinc electrode is the negative terminal. The electric current runs from negative to positive, and back around again when connected in a complete circuit. Experiment with different kinds of electrical circuits, and test the effect it has on the noise you can hear through the headphones: To produce more power, connect two tomato battery cells together. With a wire lead connect one positive terminal (copper) to the negative terminal (zinc) on the other cell.

Hook a wire lead onto each of the remaining terminals, then hold the two free ends of the leads up to touch the headphone plug. Does the noise sound different now? Does the battery seem to have more power? This circuit is a series circuit (pictured above). To build a parallel circuit with your homemade battery cells, hook the two positive (copper) terminals together with one lead and the two negative (zinc) terminals with another lead. Clip one end of the remaining leads onto each of the electrodes in one of the cells and run the free ends to the headphones. Voltage measures the force of electrons moving through a circuit, while amperage measures the amount of current (the number of electrons flowing through). In a series circuit, the voltage is doubled, but the amperage stays the same as with just one battery cell. In a parallel circuit, the amperage is doubled, but the voltage is the same as with one cell. Which kind of circuit you use depends on what balance of voltage and amperage you need.

If you want to take an accurate measure of the power in volts and amps that your tomato battery is able to produce, use a digital multimeter. You can also try powering other small electronic devices with your tomato battery! You'll need to make three or four battery cells, and connect them in a complete circuit (try both series and parallel). You can power a small light bulb or a buzzer this way. You can also experiment with other homemade batteries - use salt water, vinegar, or a potato. With this kit you can make a battery from a potato, lemon, water, coins, or even a cup of dirt or a potted plant! Experiments in this Green Science Kit include making a potato-powered clock, a lemon-powered LED bulb, and a soil-powered sound chip (it sings like a bird!). An LED, sound chip, and digital watch are included to use with your homemade batteries. Build your own electronic board to test your friends, and see how much they know about batteries and electricity! When a question is answered correctly, a light bulb will instantly turn on.

You can download our game board with questions about batteries, or come up with your own quiz about any topic you like. PDF download of game board 1.5 volt battery (size AA or D works well) Print out the game board on a piece of card stock. Beside each question, clip a paper clip onto the card. Do the same beside each answer. Turn the card over. Cut five lengths of copper wire that are long enough to reach across the card. Strip the insulation off each end of wire, taking off about one inch of coating. Hold a pair of scissors in one hand, then clamp the wire between the scissor blades and gently rotate the wire until the coating has been scored all around. Pull the coating free from the wire, leaving the copper ends exposed. Wire the board as shown to the right, creating five pairs of paper clips connected together with wire. Try sticking the bare wire end under the paper clip, or twisting it around so it stays in place. Using several pieces of tape, secure the wire pieces to the back of the card.

Cut three more lengths of wire about 6 inches long, and strip the ends. Connect wire #1 to a nail by wrapping the end securely around the nail several times, then connect the other end to the positive terminal of the battery. (If you don't have a battery holder, use a piece of electrical or masking tape to hold the wire in place). Connect wire #2 from the negative terminal of the battery to one side of the bulb socket (with bulb screwed in). Connect wire #3 to the other side of the bulb socket. Attach the free end to another nail. Your quiz game is ready to play! Touch one nail to the paper clip next to a question and the other to the paper clip by an answer. If it's the correct answer, the light bulb will light up! When you touched the nails to the paired paper clips, electricity was able to flow from the battery to the light bulb. Since the nails and paperclips are made of metal that conducts electricity, a complete circuit was made, with electrons flowing continuously from negative to positive.