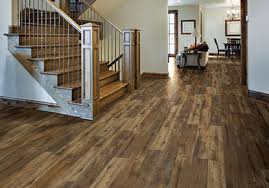
Encore Vinyl Flooring

Technical Data Sheet Art Select Data for the premium 30 mil wear layer Art Select range of wood and limestone effect flooring Technical Data Sheet Da Vinci Data for the premium 0.7 mil wear layer Da Vinci range of wood and limestone effect flooring Michelangelo Technical Data Sheet Data for the 20 mil wear layer iconic Michelangelo range of mosaic, metallic and stone effect floors Technical Data Sheet Van Gogh Data for the 20 mil wear layer large plank format Van Gogh wood effect flooring range Technical Data Sheet Opus Data for the 20 mil wear layer Opus range of wood and stone effect floors, including large format tiles and planks Technical Data Sheet Knight Tile Data for the 12 mil wear layer Knight Tile range of wood and stone effect flooring Technical Data Sheet LooseLay Data for the 20 mil wear layer LooseLay format wood effect flooring rangeFAST, FREE SHIPPING ON MOST ITEMS + NO SALES TAX* + SAVE .45¢/SQFT - ! Click Here To Read What Over Actual Customers Have Said About Us & Our Products!

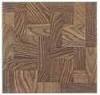
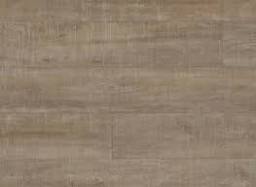
159 Items - Page 1 of 8 Encore Cider Oak 7" Luxury Vinyl Plank Flooring COREtec Plus XL Mission Oak WPC Engineered Vinyl Plank- First Quality Slightly Off Shade COREtec Plus XL Gotham Oak Engineered WPC Vinyl Plank- First Quality Slightly Off Shade COREtec Plus XL Montrose Oak WPC Engineered Vinyl Plank- First Quality Slightly Off Shade Supreme Elite Freedom Gold 9" Times Square Waterproof Loose Lay LVT Anchor Grain Oak 5.5mm WPC Click Together Engineered Vinyl Flooring Supreme Elite Freedom 4mm Princeton Cherry Waterproof Loose Lay Vinyl Plank Supreme Elite Freedom Dark Night Waterproof Loose Lay Vinyl Plank Supreme Click INNOcore WPC Pecan Maple Vinyl Plank Flooring Dura Core Alabama Oak WPC Click Together Engineered Vinyl Flooring Dura Core Montana Oak WPC Click Together Engineered Vinyl Flooring Supreme Click Elite Waterproof LVT Vinyl Plank Nebraska Pine Supreme Elite Freedom Gold Series Arizona Sunset Waterproof Loose Lay Vinyl Plank

Natural Elegance Elite Waterproof Click Together Vinyl Plank Northern Lights Natural Elegance Elite Waterproof Click Together Vinyl Plank Ponderosa Hickory Natural Elegance Moon Beam Gray 9" Waterproof Click Together Vinyl Plank Supreme Elite Freedom Gold Series Fireside Hickory Waterproof Loose Lay Vinyl Plank Supreme Elite Freedom Gold Series 7" Winter Sky Waterproof Loose Lay Vinyl Plank Natural Elegance Broadmore Hickory Waterproof 9" Click Together Vinyl Plank You have no items in your shopping cart.Viewing Project in > Hey, it's Mr. Tile. Now are you --Good to see you again. I'm all ready for you over here. I made the mock up for you. You know, when you called me and said you had a way of putting ceramic tile directly on top of vinyl I said, I've got to see this. Well Ron, I'm here to prove it to you today. Now you were here a while back. You showed us how to put ceramic tile on top of plastic laminate, a countertop in that case.
Now this is a similar process, but in this case, we're putting it over a vinyl floor. Regardless of the surface, Ron, as long as it comes from a tree or it's made by man, regardless of what it is, except carpeting or upholstering the human body, we can tile on it. All right, there are two key components to Armand's tiling system. One is this adhesive that's applied directly to the face of the vinyl floor tile.
Baby Kittens For Sale In Columbus OhioThe second component is a non woven synthetic fabric Armand calls, thin skin.
Blue Pitbull Puppies For Sale Hawaii It's laid on top, then pressed firmly into the adhesive, using either a trowel or a wallboard joint knife.
Used Furniture Buyers Clearwater Fl
The adhesive sticks to the vinyl flooring and the fabric bonds to the glue. Next, standard thin set cement is mixed up. Armand says it should end up being the consistency of ketchup. It's then troweled onto the fabric in a level, even coat. It will dry in about half an hour or so. Well, I'd say you've got what looks and feels like a cement surface here. We actually created a thin underlayment layer that's probably less than a 32nd of an inch. So we didn't raise the floor, we didn't use any nails or screws. And we didn't add any weight. Now a second, heavier coat of think set will be applied on top of the first. Armand uses the smooth edge of the trowel to spread the cement. Then, he changes to the knot side and holding the tool at a steep angle, creates parallel ridges that are all the same height. Now this will insure that there's an even coating beneath each tile and no low spots or voids that might cause tiles to break or crack later on. At first, Armand sets the tiles so the edges actually touch each other.
Then he wiggles each tile just a bit while gently pulling it away from its neighbor. The wiggling insures good contact with the cement below. The touching, then pulling away keeps the joints clean and free of excess cement. Now after three decades of tiling, Armand has come up with a couple of inventions to save time and improve results like this easy to grip tile spacer. One side is for intersecting joints and the other keeps the edges evenly spaced. Around the perimeter or wherever you don't have a four pointer intersection -- there you go Ron, beat them in.Now, question, we already pushed these down or wiggled them around -- -- what's the purpose then of going back with a mallet?To pop out any remaining air. Okay, that's your next step. And here's invention number two. No, it's not a hockey puck. I hear that sound, Ron. What does that tell you? The sound of a high tile, right? Yeah, what we call a toe kicker. A toe kicker as in tripping, right?

All right, so this is very clever. So this --you can tell by feel and by sound --Now you've got the opportunity to use that dead blow rubber mallet which I prefer and to beat that tile down and get it down and keep maneuvering the puck as you do that until you're comfortable with the sound. Don't be afraid, you can't hurt it. While the spacers may go in easily, they practically pop out with a sweep of the hand. With the cement dry, now it's time for grout. Armand mixes his on the stiff side and uses a rubber float with plenty of pressure to force the mixture all the way down to the bottom of the joints. Then, holding the float on an angle, he moves diagonally across the face of the tile, removing as much of the excess as possible. We're going to do first, a rough wash. Basically it cleans it off the surface of the tile, lubricates the joint a little bit. The second wash will clean the surface of the tile and the grout joint, smoothing it as we go. And it's possible we may do a third wash.

As soon as this dries, we're going to use a soft dry cloth. It's like polishing your car after you wax it. Now, lest we forget, let's try to remember back to what this looked like just a few hours ago before we started this with that, with that vinyl. You began with the vinyl.And then on top of that went the thin skin named after Mr. Tavi[?]. And on top of that, you put the first thin coat of thin set -- -- on top of that. Then we put our, our tile setting mortar on that. Put mortar on that. Teeth of a trowel, we put the mortar. And then the tile. We installed the tile. Now you've got your name and your face all over this system. Does that mean it's personally guaranteed by you?I'm fully confident and I have a written 15 year warranty. Hey, listen, thanks for coming by. It's always fun to have you and I always learn something.Call me any time. But then again, you are a lot older than I am. It's only years, Ron. Last time he was here, I discovered that Armand was a songwriter and I coaxed a performance out of him.
It has magic powers, most would say. Now I've learned he's also a poet. So I've asked for an encore.Then years have passed, some would say and others would only sigh. And yet some more would only sit right down and cry. Well most [ ? ] misfortune hangs over me, [ ? ] would only be a starter for a guy like me. So for the one who [ ? ], I dedicate my life, my soul. A Unique and Time-Saving Way to Apply Ceramic Tile Directly on Top of Vinyl Flooring Using the Tavy Thin Skin System, home owners are now able to lay ceramic tile over surfaces that would have never before been possible. Ron and Armen Tavy demonstrate one such surface in this project, as they install ceramic tile over vinyl flooring. You can find the Tavy products here. Apply the Thin Skin Fabric Begin the project by creating the Thin Skin surface. Use a trowel to spread a thin layer of adhesive across the entire surface that is to be tiled, and then press the fabric into the adhesive with a large putty knife.
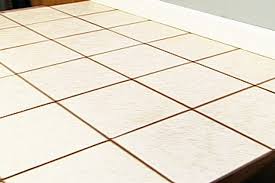
Now you have created a surface that will bond with the mortar. Remember, the adhesive sticks to the vinyl and the fabric sticks to the adhesive. Skim Coat the Fabric with Mortar Mix a thin batch of mortar and spread it over the Tavy fabric with a flat edged trowel. The mortar should be about the consistency of ketchup. This skim coat should be very thin, and only needs to be thick enough to bond with the fabric. After it dries in about 30 minutes, you will have created a smooth, masonry surface upon which to install your tile. All of the worries that come with installing tile over vinyl, have literally been covered up. Begin this step after the skim coat is dry. Trowel on a 2nd coat of mortar, this time using a 1/4" notched trowel. Be sure to create even ridges over the entire surface, as this will prevent air gaps. Air gaps can lead to cracked tiles down the road. Set the tiles into the mortar, making sure to wiggle each tile into position, as this will ensure uniform coverage of the mortar onto the back of each tile.

The edges will be cleaner if you place the tiles edge to edge and the slide them apart to create the correct spacing. As you work your way across the field of tile, setting them into place, install spacers at every intersection to ensure that all of the grout lines in your floor are uniform. Armen Tavy has invented a type of spacer that is double sided and can be used between two tiles, or at a corner between four tiles. As you install the spacers, tap each tile with a rubber or plastic mallet to ensure that all of the air underneath the tile has been forced out. Check for High Tiles The Tavy System also includes a unique tool called a tile puck. This small, hand held tool is run back and forth over each joint as you install the field, and will notify you with a small click if you have adjacent tiles that are different heights. Work your way across your joints with your Tavy Tile Puck and a rubber mallet to ensure that you don't have any high spots in your floor. Grout should be worked into the joints with a grout float, working across the floor at a 45 degree angle.