Fabric Cover For Cedar Chest

Recovering a cedar chest is easy to do yourself. A cedar chest is not only useful for storage and extra seating, it’s often treasured as a family heirloom. Although the wood of the chest will remain sturdy for many years, the fabric cover can become faded or worn. Replacing the cover of a cedar chest is an easy, do-it-yourself project that gives the piece a like-new appearance and allows you to match it to any decor. Open the lid of the cedar chest. Remove the screws from the hinges with a screwdriver and carefully remove the lid from the chest. Set the screws aside. Place the lid on a flat surface with the upholstered side facing down. Remove the staples holding down the upholstery using a pair of needle-nose pliers. Remove and discard the old upholstery fabric. If the cushioning or batting requires replacement, remove and discard it, as well. Lay your new upholstery fabric flat and place the cedar chest lid on top of it. Using the lid as a pattern, mark the cutting lines with chalk, leaving a margin of about 6 inches on all four sides.

Cut the fabric using sharp sewing scissors. Cut cotton batting or foam if you are also replacing the lid’s cushion. Use the fabric you just cut as a pattern, cutting the batting to the same dimensions. Center the lid, top down, over the new cushion material, if you are using it. Pulling the batting or foam tightly over the edge and onto the bottom of the lid, staple-gun the batting or cushion material at regular intervals all around the margin of the lid. Place the staples no more than 2 inches apart. Cut away and discard excess material remaining beyond the staples. Lay the upholstery fabric right side down. Center the lid, cushion side down, on top of the fabric. Turn the fabric under by 1 or 2 inches to make a neat hem, then attach the fabric to the lid using a staple gun. Start stapling in the middle of one side, stopping when you get close to the corners. Repeat on each side, pulling the fabric taut without stretching it too tight. Staple the corners last, folding them neatly to accommodate the extra fabric.
Reattach the lid to the hinges with screws. Things You Will Need Screwdriver Needle nose pliers Upholstery fabric Chalk Sharp sewing scissors Cotton batting or foam (optional) Staple gun and staples References Redbook: Reupholster a Seat CushionRepairhome: Learn To Do It Yourself -- How To Reupholster Furniture Photo Credits Comstock Images/Comstock/Getty Images Suggest a Correction
Wedding Dress Shops Birmingham City CentreI had every intention of painting my cedar chest, until I realized that was a bigger project than I wanted to take on.
Cats For Sale Gatineau(You can see that before I decided to paint it I had filled in the engraved hearts with wood filler.)
Hot Tub Suites In MaineInstead, I decided to “slipcover” it. The only materials needed for this project are:

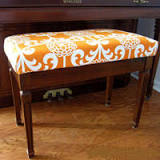
fabric, fabric scissors, a glue gun, and a staple gun First, I measured the top and the sides to estimate how much fabric I would need, and then I headed to the fabric store to pick some out. My cedar chest has padding on top similar to an upholstered chair. I did the same thing that I would do for an upholstered chair. I looked underneath the lid to find the 4 screws holding the seat cushion in place. I unscrewed them and took the cushion off. I laid my new fabric down on the floor and set the cushion on top of it. Allowing enough fabric to fold around the cushion, I cut it out. Then I stapled the new fabric all around the underside of the cushion, and screwed it back to the chest. I cut two six inch wide strips of fabric to cover the front corners of the chest. (See the one on the left there that I pulled toward my camera bag) Those two strips form the underside of the “box pleat”. The actual length depends on how all your cedar chest is, plus you will want to add an inch or two.

I took one strip, folded each long edge in about 1/2 “ to the underside of the fabric, and hot glued it down all along the edge. I also did the same on the bottom of the strip that touches the floor. Do the same for the other long strip. Then, center each one along the front corner edges of the chest, and hot glue or staple it to the inside of the cedar chest. Next, measure and cut a front panel and two side panels and do the same thing. Be sure to center and overlap them over the two longer “box pleats”. You can glue them to the inside of the cedar chest or staple them. Notice that I had to cut a small crescent shape into the fabric below for the latch to fit into when the lid was closed. That’s all there is to it!The fabric just arrived for the top of my bedroom cedar chest and it is LOVELY! I found it at Osborne & Little and am just head over heels for it! Time to get motivated to give my old cedar chest a new look for my new bedroom. Here is the "victim".

I originally bought this chest at Bed Bath and Beyond about 11 years ago for under $100. Time to breathe some new life into her! Exterior and interior fabric 1) Sand the chest and paint it!! I choose the color of our walls BM Edgecombe Gray but in semi-gloss. 2) Cut Foam to shape and glue to top to keep from shifting. If you don't have a custom foam cutter near by, you'll have to trim it to size. 3) Cover with fabric - pull tight and staple. It is MUCH easier if you have someone to help hold the fabric in place. My husband was a sport and helped me :) I carefully folded the fabric at the corners to get them looking just right. My plan was to create a "tufted" top, but found the foam that I used too thick to drive the extra long needle through it...bummmmmmer it would have looked fabulous! Instead I used the buttons as accent pieces to cover the holes for the original hardware. I covered the buttons using extra fabric so they would match exactly.